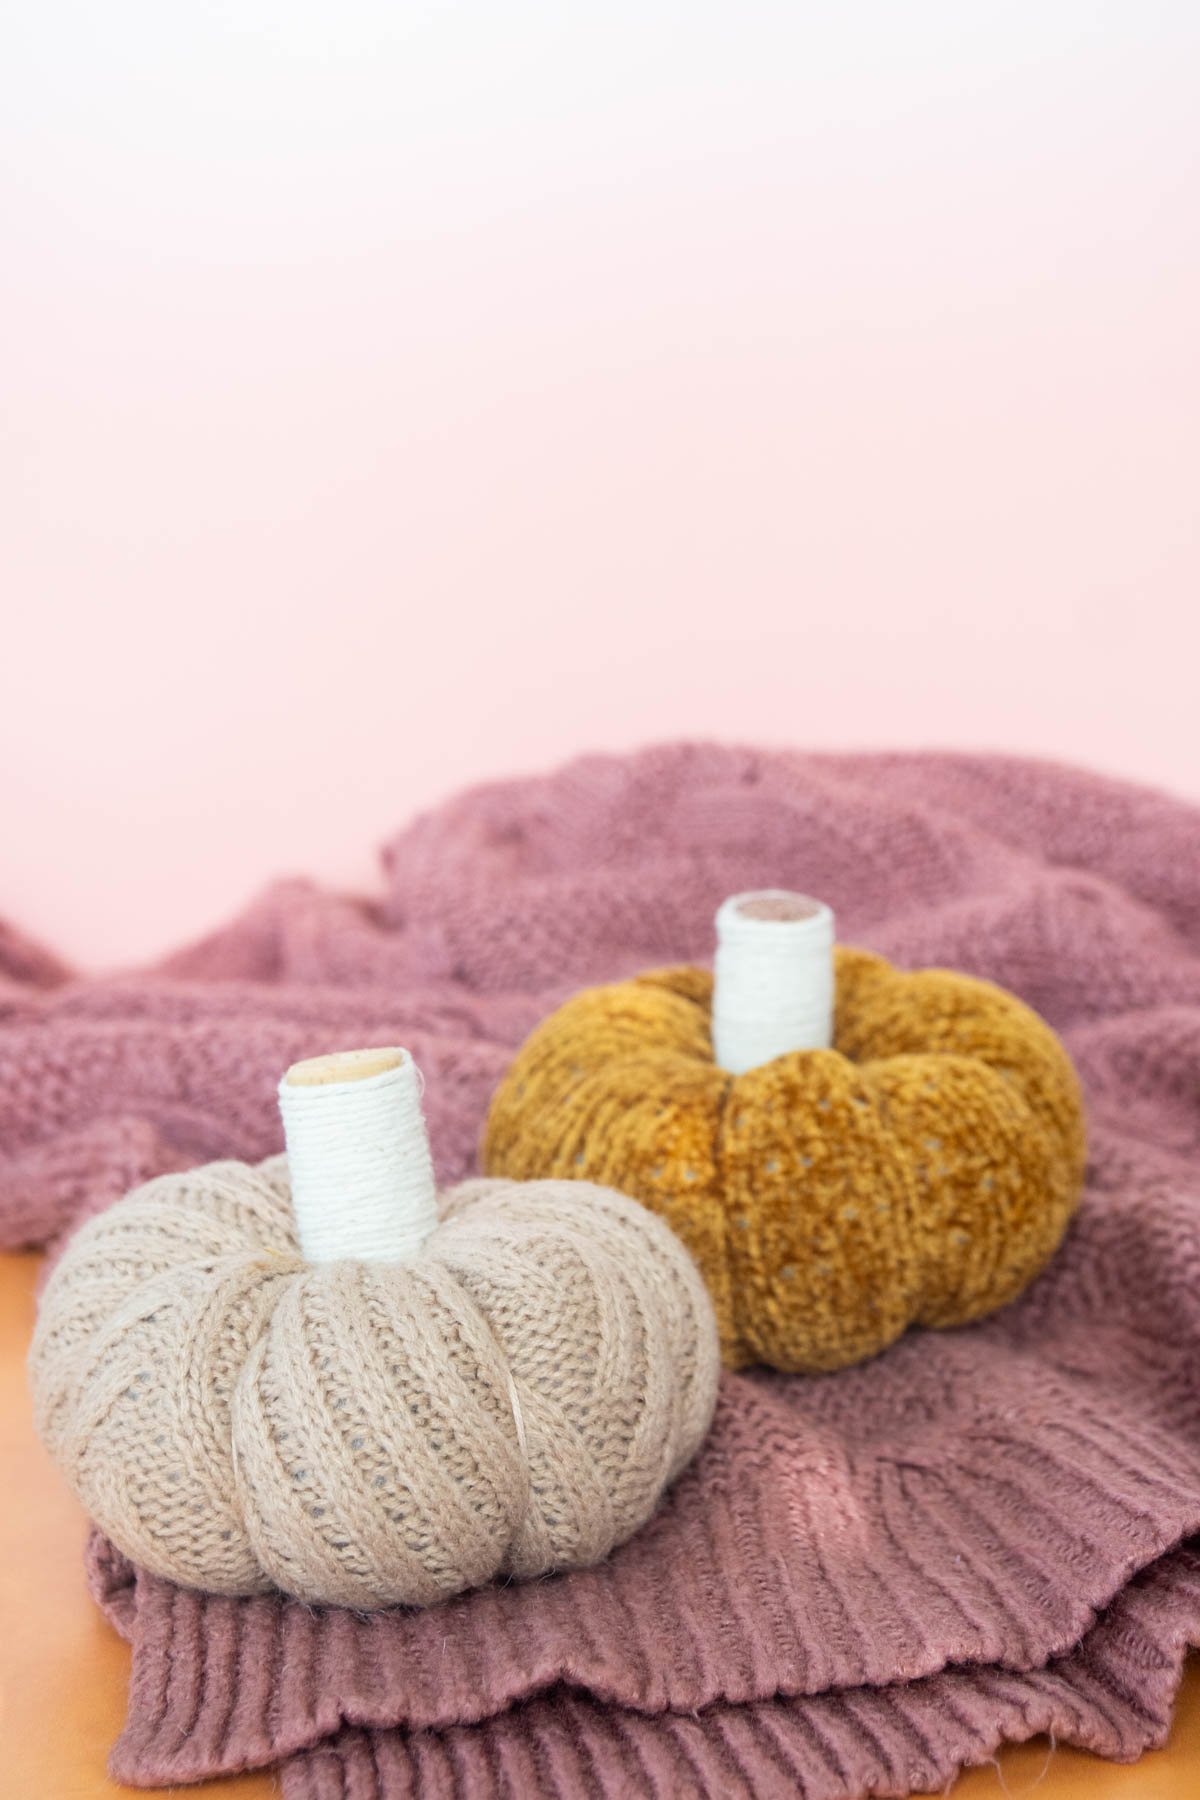
Make your very own sweater pumpkins in minutes with this simple tutorial! It’s one of the easiest and most affordable fall crafts, plus it’s fun to do with other people for a fun fall girls night!
Make one or make an entire pumpkin patch full of sweaters – it’s up to you but be forewarned, once you get started, you may not want to stop! My sister was supposed to create one for this tutorial and ended up making one for everyone in her family!
Want to save this Idea?
Enter your email below and we’ll send this idea straight to your inbox (plus you’ll receive tons of fun weekly ideas from us!)
DIY Sweater Pumpkins
Whether you’re here because you saw the viral pumpkin sweater video on our Instagram account or just because you saw this fun craft elsewhere, we’re glad you’re here!
A few weeks ago we were shopping for some upcoming fall art projects and I saw a bunch of sweater pumpkins at one of the stores. I loved the idea and bought a couple then realized that we could probably make our own.
I grabbed a bunch of fall colored sweaters at a thrift store, made some cake mix pumpkin cookies and spiced apple cider, invited some friends over, and we had a great time making all sorts of pumpkin sweaters that are soft, fluffy, and just adorable.
Supplies
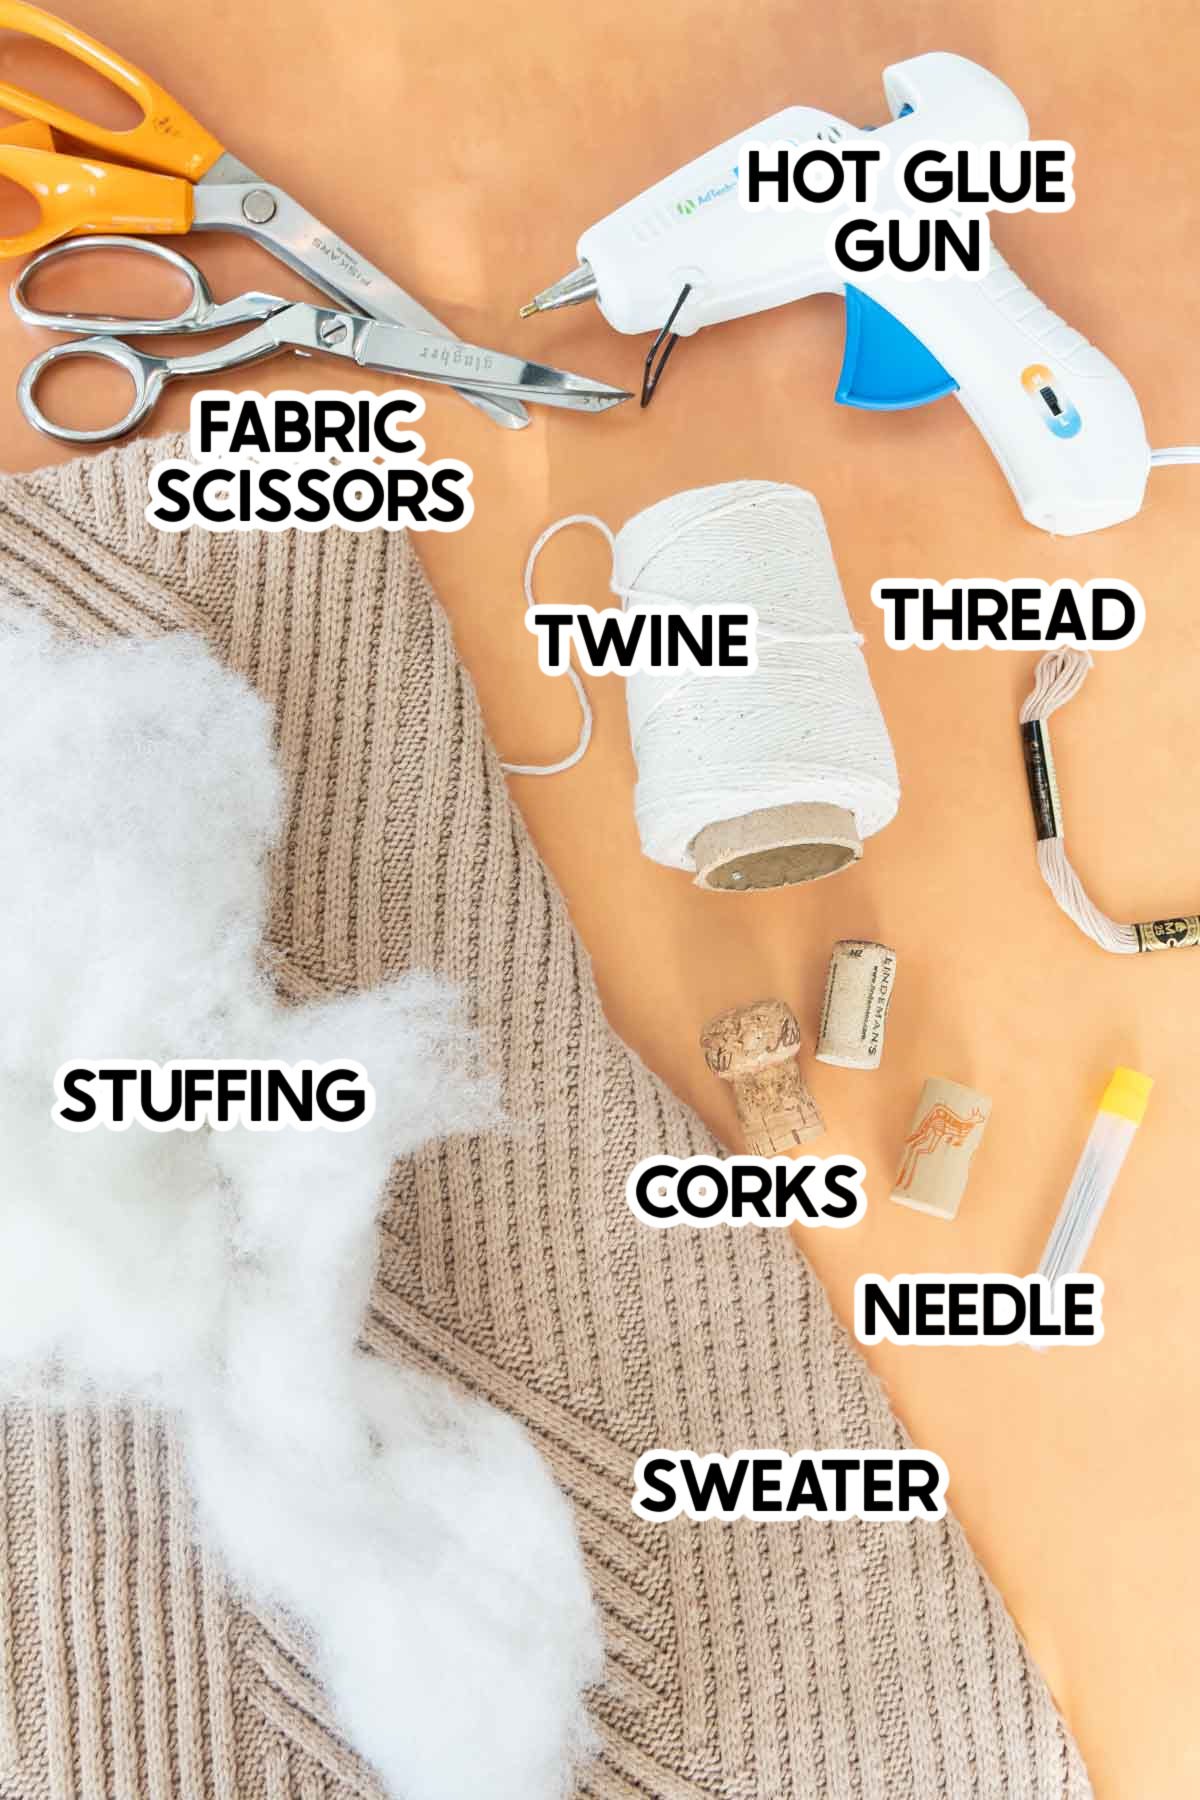
Supply Notes
- Fabric Scissors – I love these Ginghers so much. They’re the gold standard in fabric scissors and if you only use them on fabric, they’ll last forever. I just checked and I bought mine in 2013 and they’re still going strong.
- Stuffing – this is the stuffing we used, it was perfect for the pumpkins! One 32-oz bag made two large pumpkins (from the body of the sweaters) and 10ish small sleeve pumpkins.
- Twine – I just used neutral colored butcher’s twine because it’s what I had on hand but you could also use actual jute colored twine like this, whatever you think looks best.
- Corks – any type of corks work, I just grabbed some extras my neighbors had on hand but you could also buy a pack like this if you don’t have any. Or you could use sticks too!
- Thread – we used embroidery thread that matched the color of the sweaters. You could also just use sewing thread, but I personally think the thicker thread does a better job of pulling in the pumpkin sections and won’t break as easily! You can either have people bring thread that matches their sweater or buy an affordable pack like this with a million colors – they’re likely to find something that matches!
- Sweaters – each sweater will give you one large pumpkin plus 2-4 small pumpkins depending on how big you want to make them! I’ve included some notes below for choosing sweaters that will work best to make pumpkins.
Tips for choosing sweaters
Unfortunately not all sweaters will work for these pumpkin crafts or at least some sweaters will work better for others.
I recommend avoiding sweaters that have:
- Large gaps, holes, or spacing in the design – you need to be able to sew the sweater together and large spaces make it tough to do that.
- Cut sides, slits, or different length sides – you want to be able to cut the sweater into one even rectangle so if there are slits or different lengths, you’ll end up having to waste a lot of the sweater!
- Lace or any sort of intricate designs – you’re going to be sewing through the pumpkin and pulling it tight. Avoid anything that might rip, tear, or be difficult to work with when you thread through it.
- Zippers, buttons, or other chunky pieces – those are all going to be really hard to pull thread through!
- Cardigans – you want something that’s closed, not open.
- Fabrics that don’t stretch – stick with something that’s fluffy, chunky, and will stretch will when stuffed with the pillow stuffing!
How to Make Sweater Pumpkins
Here’s everything you need to know about making these sweater pumpkins. If you get lost, feel free to look at the video example at the bottom of this post or the pictures to help you figure it out. I promise they are really beginner friendly! Let’s get started.
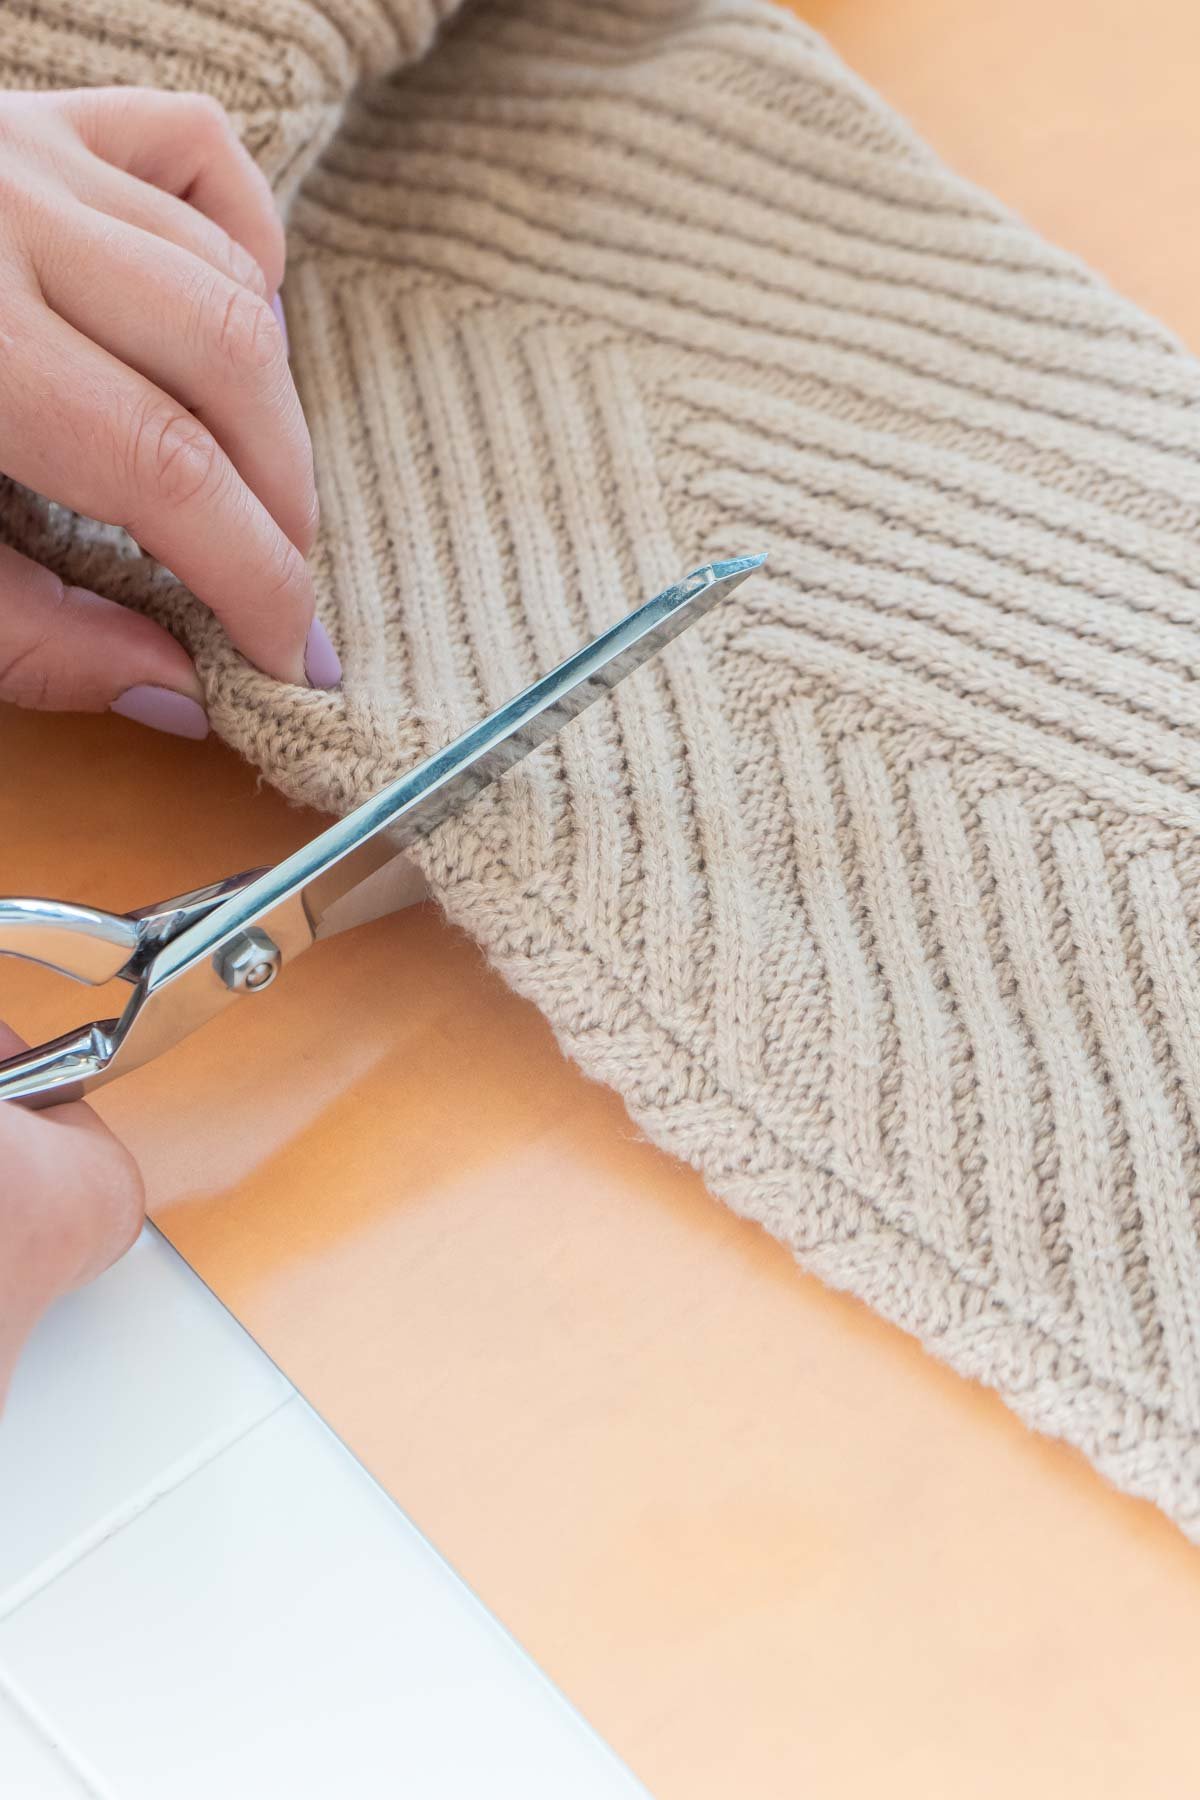
1 – Cut The Fabric
To start, decide what size pumpkin you want. For larger pumpkins, you will want to use the torso of the sweater, medium pumpkins are best done with the sleeves, and the cuffs make the perfect small pumpkins.
Once you decide the shape, it is time to cut the fabric out. If you are using a sleeve or cuff, lay the sweater sleeve horizontally across a flat surface. Then make one straight vertical cut from the seam of the sleeve to the top. This will detach the sleeve from the sweater completely.
Now that the sleeve is detached, you need to make another vertical cut from the seam to the top. This cut needs to be a minimum of four inches away from the first cut. The bigger section of fabric the taller your pumpkin will be. I recommend making it no bigger than 8 inches wide for a sleeve.
Now you should be left with a four to eight inch tube of fabric. Once you have that you are ready to move on to the next step.
Make sure you save the rest of that sleeve if you want to make a set of pumpkins.
3 – Sew The Pumpkin
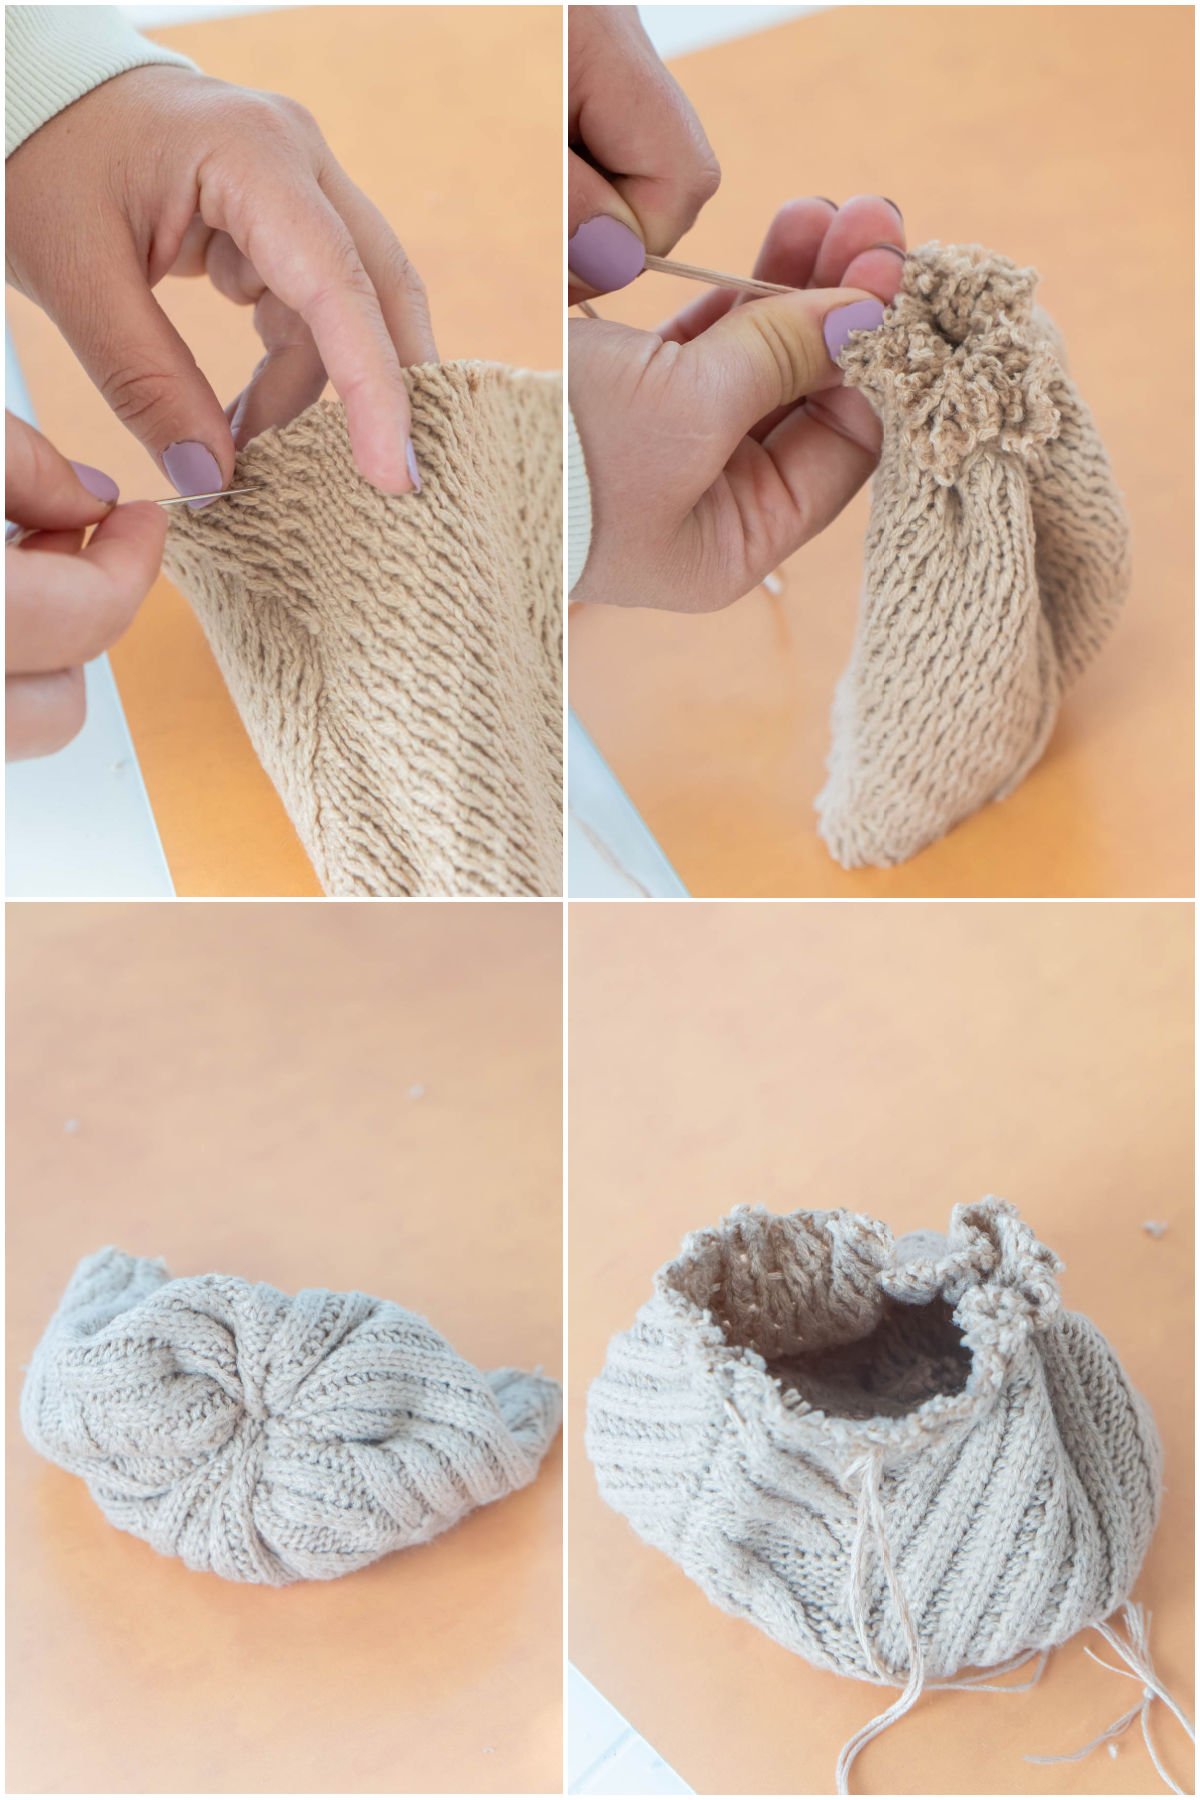
Begin by threading your needle and tying the two ends of your thread together so you have double the thread. You will want enough thread to go around the circumference of your sleeve opening one and a half times.
Sew the Pumpkin Top
Next, turn your sleeve fabric inside out so the seam is on the outside.
For this project, you will be using a running stitch. An example of the running stitch can be found here. It basically just means going in and out of the fabric in a straight line.
Start your running stitch, roughly a quarter inch from the edge of your opening.
Continue your running stitch all the way around the edge of the of the circle until you get back to where you began your stitch. Don’t sew through both sides of the sleeve at one time!
Once you get to where you began your stitch, take your two ends and pull them tightly until you close up the circle.
Tie off the two ends, making them as tight as possible so that the circle is closed.
Cut any loose strings off and flip your fabric inside out so that the rough edges are inside of the pumpkin.
Sew The Bottom
Thread the needle just like you did before and again do a running stitch around the outside of the final opening.
Once you make it back to where you began sewing gently let the needle and other end of the thread lay to the side while you add the stuffing.
4 – Stuff the Pumpkin
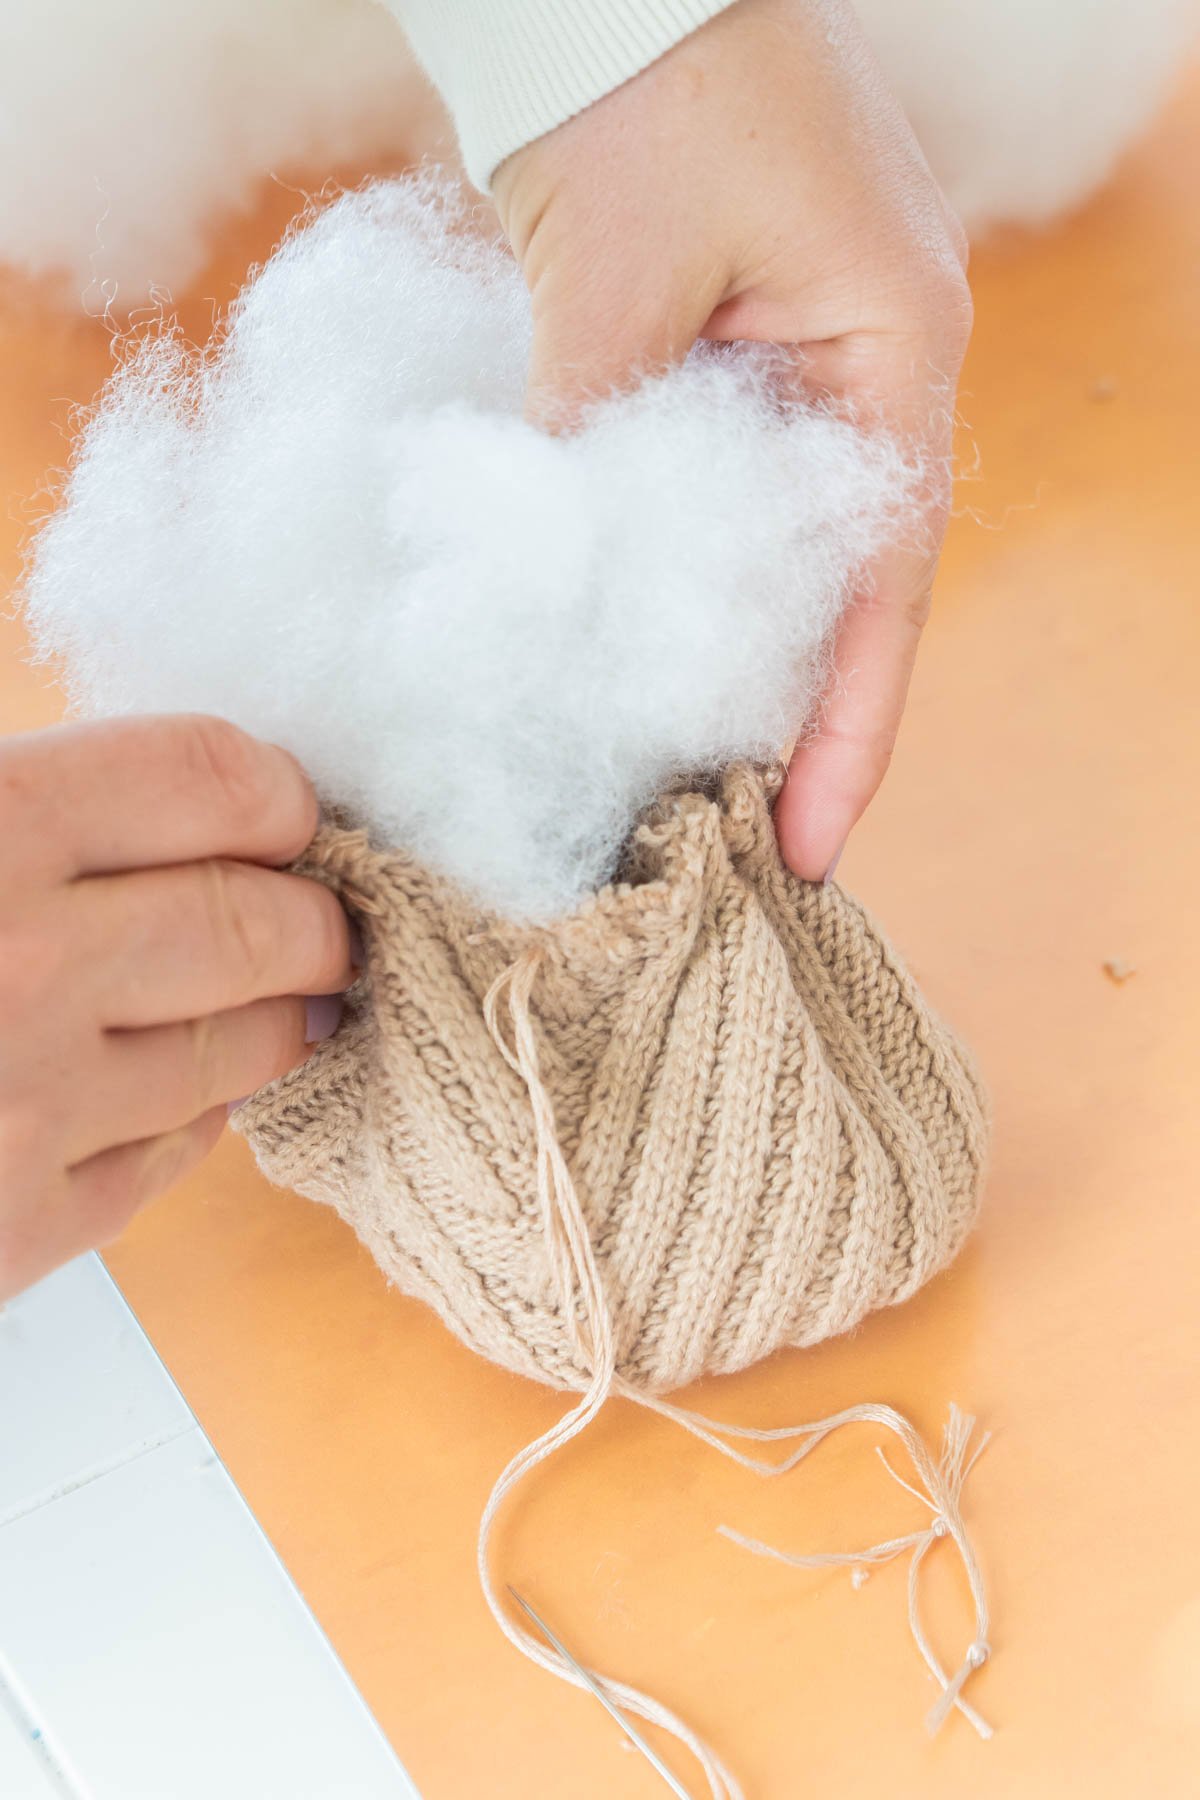
Stuff the pumpkin with the fluff until it is completely full. You will want it to be as stuffed as you can without having troubles, closing it.
Once you have as much fluff as you want in your pumpkin, you will take the thread in your in one hand and gently push the fabric opening closed with the other hand until it is as tight as possible.
Then you will tie off the end of the fabric again, keeping it as tight as possible.
Any loose fabric can be tucked in to the inside of the pumpkin by gently pushing with your fingers or using a pen as needed.
5 – Create The Grooves
Now that your pumpkin is stuffed and tied off, it’s time to create the pumpkin shape.
Start by adjusting the stuffing with your hands in your pumpkin as needed so that it is as round as possible.
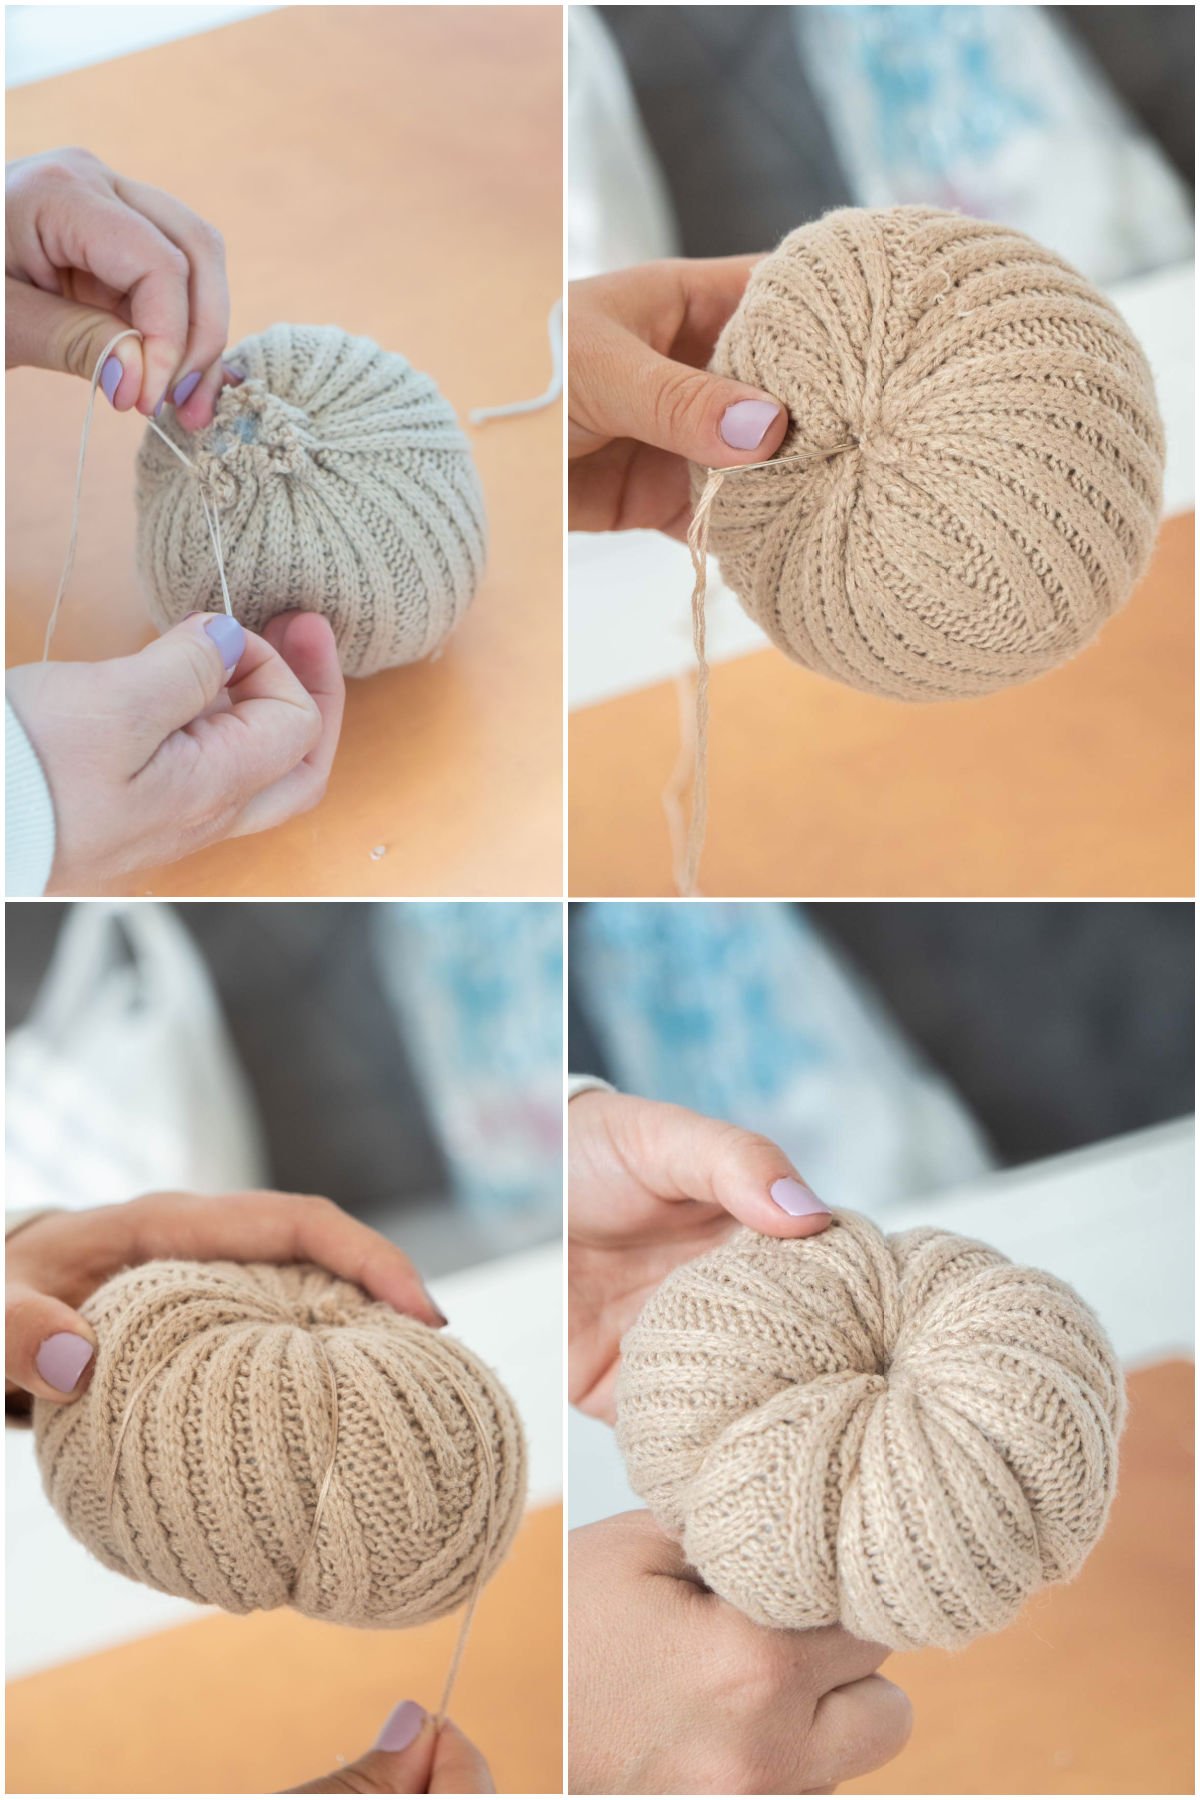
Next, you will need to double thread your needle again. You will need enough thread to wrap around your pumpkin three times. The amount will very depending on the size of your pumpkin.
You will also need to make an extra large, knot at the end of your thread so that it does not easily go through the bottom of your pumpkin.
Once your needle and thread are ready to go, start by placing the needle through the top of your pumpkin. Push the needle until you see it come out the center of the bottom of your pumpkin then pull the thread all the way through. Make sure to watch out for your fingers during this step!
Now take the thread and needle, and go back to the top of the pumpkin and repeat this step, pushing the needle through the top of the pumpkin bottom of the pumpkin. You are basically creating a loop around your pumpkin then pulling it tight to create the pumpkin indent.
You will continue to do this six times, making sure to place the thread where you want the pumpkin ridges to go as you go along.
Once you have all of the ridges completed, go back through and tighten them one by one to get the pumpkin look you want. Once the thread is tightened tie it off at the bottom.
6 – Add Stem and Finish
Now that the pumpkin is formed, all that’s left to do is a stem.
For the stem, grab your cork, twine, and hot glue. Place a small dab of hot glue at the top edge of the cork, followed with the end of your twine.
Once the end is secure, begin to wrap the twine tightly around cork until you reach the bottom where you will hot glue it again to secure the twine in place.
Finally add hot glue to the bottom of your cork and place it firmly onto the top of your pumpkin.
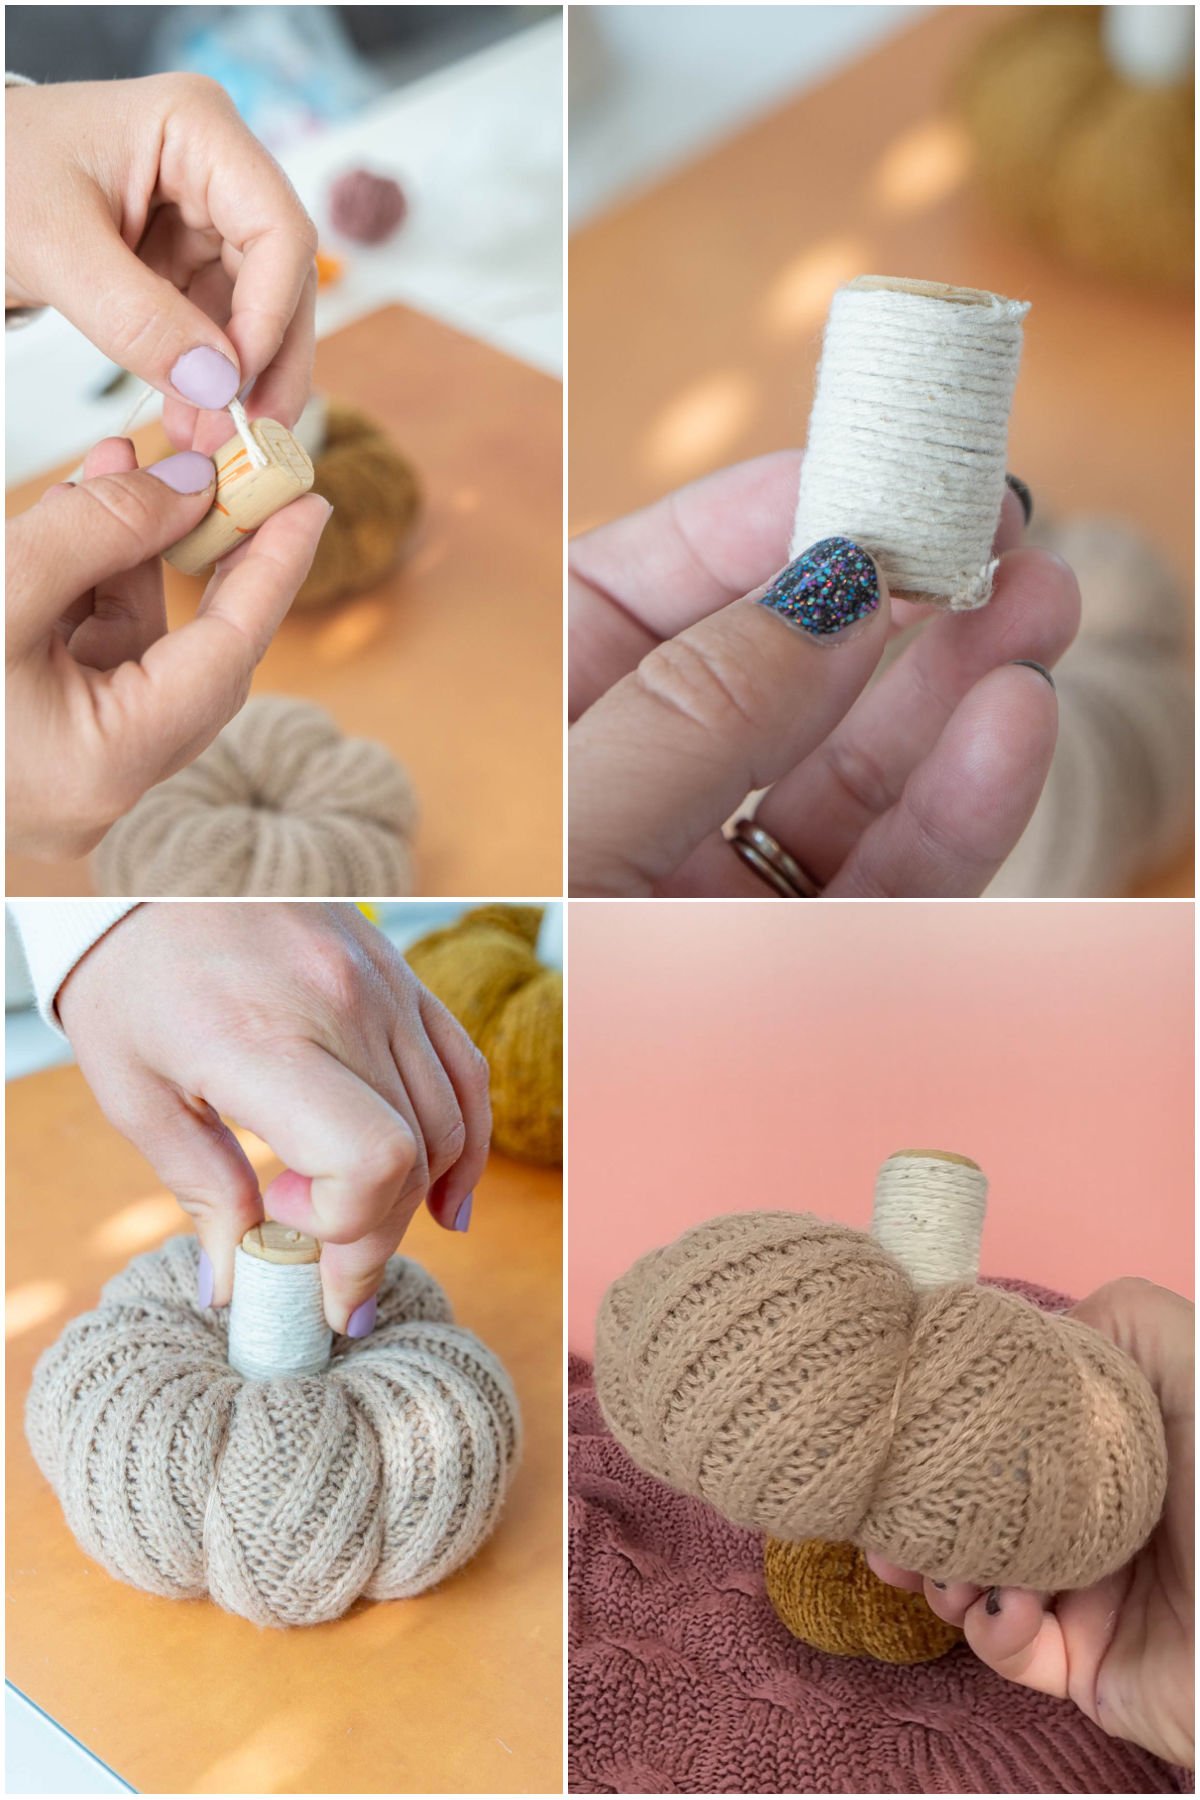
There you go – you now are the owner of your very own sweater pumpkin! You can either stop with one or use the other sleeves or body (whichever you haven’t used yet) to make other coordinating pumpkins so you have your very own sweater pumpkin patch!
Have everyone bring their own sweater and do this as a craft fall night – one of my favorite fall party ideas!

Sweater Pumpkin Video Tutorial
If you’re more of a visual learner, here’s a quick video showing the process of making these adorable sweater pumpkins! I highly recommend using it in conjunction with the written tutorial because there are WAY more details in the written post!
Expert Tips
Make sure to pull the thread tight to get the look of a pumpkin! If you don’t pull it tight enough, it’ll just end up looking more like a ball or oval – not the cute pumpkin you want!
Take your sweater with you to a craft store to choose your embroidery thread or get a large pack of tons of colors like the one I linked before. You want it to match as closely as possible so you don’t see the thread!
Make your cuts carefully based on how large you want your pumpkins. You can often get two small pumpkins out of sleeves if you cut them in the right places! But if you cut first and cut right in the middle, you may end up wasting a bunch of the sweater!
Try out different corks to give the pumpkins different looks. We were lucky enough to have some small, some odd-shaped, and some bigger ones. The variety made them look like different types of pumpkins!
The bigger the pumpkin the harder it will be to make the grooves. The needle can easily get lost in all the fluff with the bigger pumpkins so be careful and avoid having it more than 8 inches wide. Start with a small or medium size pumpkin to practice on.
More Easy Fall Crafts
If you like fall crafts, you have to try out these fun ideas next!
- Rope pumpkins – cute pumpkins made out of dollar store materials!
- Apple craft – simple apple craft using popsicle sticks and paper!
- Scarecrow craft – another simple craft using popsicle sticks and glue!
- Pumpkin patch craft – a fun one for the entire family!
- Turkey crafts – tons of turkey craft ideas for all ages!
Want more Goodies?
Want more delicious recipes just like this one? Enter your first name and email address in the form below to join the Play Party Plan community! You’ll receive weekly recipes and party ideas directly to your inbox!

Sweater Pumpkins
Ingredients
- 16 oz Pillow stuffing
- 3 pieces Twine
- 3 Corks
- 1 pack Embroidery thread that matches the sweater
- 1 Large sweater
Instructions
Cut the Sweater
- If you are using a sleeve or cuff, lay the sweater sleeve horizontally across a flat surface. Then make one straight vertical cut from the seam of the sleeve to the top. This will detach the sleeve from the sweater completely.1 Large sweater
- Now that the sleeve is detached, cut another vertical cut from the seam to the top. This cut needs to be a minimum of four inches away from the first cut.
Sew the Pumpkin
- Begin by threading your needle and tying the two ends of your thread together so you have double the thread. You will want enough thread to go around the circumference of your sleeve opening one and a half times.1 pack Embroidery thread
- Next, turn your sleeve fabric inside out so the seam is on the outside.
- Start your running stitch, roughly a quarter inch from the edge of your opening. Continue your running stitch all the way around the edge of the of the circle until you get back to where you began your stitch. Don’t sew through both sides of the sleeve at one time!
- Once you get to where you began your stitch, take your two ends and pull them tightly until you close up the circle.
- Tie off the two ends, making them as tight as possible so that the circle is closed.
- Cut any loose strings off and flip your fabric inside out so that the rough edges are inside of the pumpkin.
- Thread the needle just like you did before and again do a running stitch around the outside of the final opening.
- Once you make it back to where you began sewing gently let the needle and other end of the thread lay to the side while you add the stuffing.
Stuff the Pumpkin
- Stuff the pumpkin with the fluff until it is completely full. You will want it to be as stuffed as you can without having troubles, closing it.16 oz Pillow stuffing
- Once you have as much fluff as you want in your pumpkin, you will take the thread in your in one hand and gently push the fabric opening closed with the other hand until it is as tight as possible.
- Then you will tie off the end of the fabric again, keeping it as tight as possible.Any loose fabric can be tucked in to the inside of the pumpkin by gently pushing with your fingers or using a pen as needed.
Create the Pumpkin Ridges
- Start by adjusting the stuffing with your hands in your pumpkin as needed so that it is as round as possible.
- Next, you will need to double thread your needle again and make an extra large knot at the end so it doesn’t easily go through the pumpkin. You will need enough thread to wrap around your pumpkin three times. The amount will very depending on the size of your pumpkin.
- Once your needle and thread are ready to go, start by placing the needle through the top of your pumpkin. Push the needle until you see it come out the center of the bottom of your pumpkin then pull the thread all the way through.
- Now take the thread and needle, and go back to the top of the pumpkin and repeat this step, pushing the needle through the top of the pumpkin bottom of the pumpkin. You are basically creating a loop around your pumpkin then pulling it tight to create the pumpkin indent.
- You will continue to do this six times, making sure to place the thread where you want the pumpkin ridges to go as you go along.
- Once you have all of the ridges completed, go back through and tighten them one by one to get the pumpkin look you want. Once the thread is tightened tie it off at the bottom.
Add the Cork Stem
- Grab your cork, twine, and hot glue. Place a small dab of hot glue at the top edge of the cork, followed with the end of your twine.3 pieces Twine, 3 Corks
- Once the end is secure, begin to wrap the twine tightly around cork until you reach the bottom where you will hot glue it again to secure the twine in place.
- Finally add hot glue to the bottom of your cork and place it firmly onto the top of your pumpkin.
Tips & Notes:
- Large gaps, holes, or spacing in the design – you need to be able to sew the sweater together and large spaces make it tough to do that.
- Cut sides, slits, or different length sides – you want to be able to cut the sweater into one even rectangle so if there are slits or different lengths, you’ll end up having to waste a lot of the sweater!
- Lace or any sort of intricate designs – you’re going to be sewing through the pumpkin and pulling it tight. Avoid anything that might rip, tear, or be difficult to work with when you thread through it.
- Zippers, buttons, or other chunky pieces – those are all going to be really hard to pull thread through!
- Cardigans – you want something that’s closed, not open.
- Fabrics that don’t stretch – stick with something that’s fluffy, chunky, and will stretch will when stuffed with the pillow stuffing!
Want More Fun Ideas?
Want more fun ideas like this one? Enter your first name and email address in the form below to join the Play Party Plan community! You’ll receive weekly recipes, party ideas, games, and more directly to your inbox!




Leave a Reply