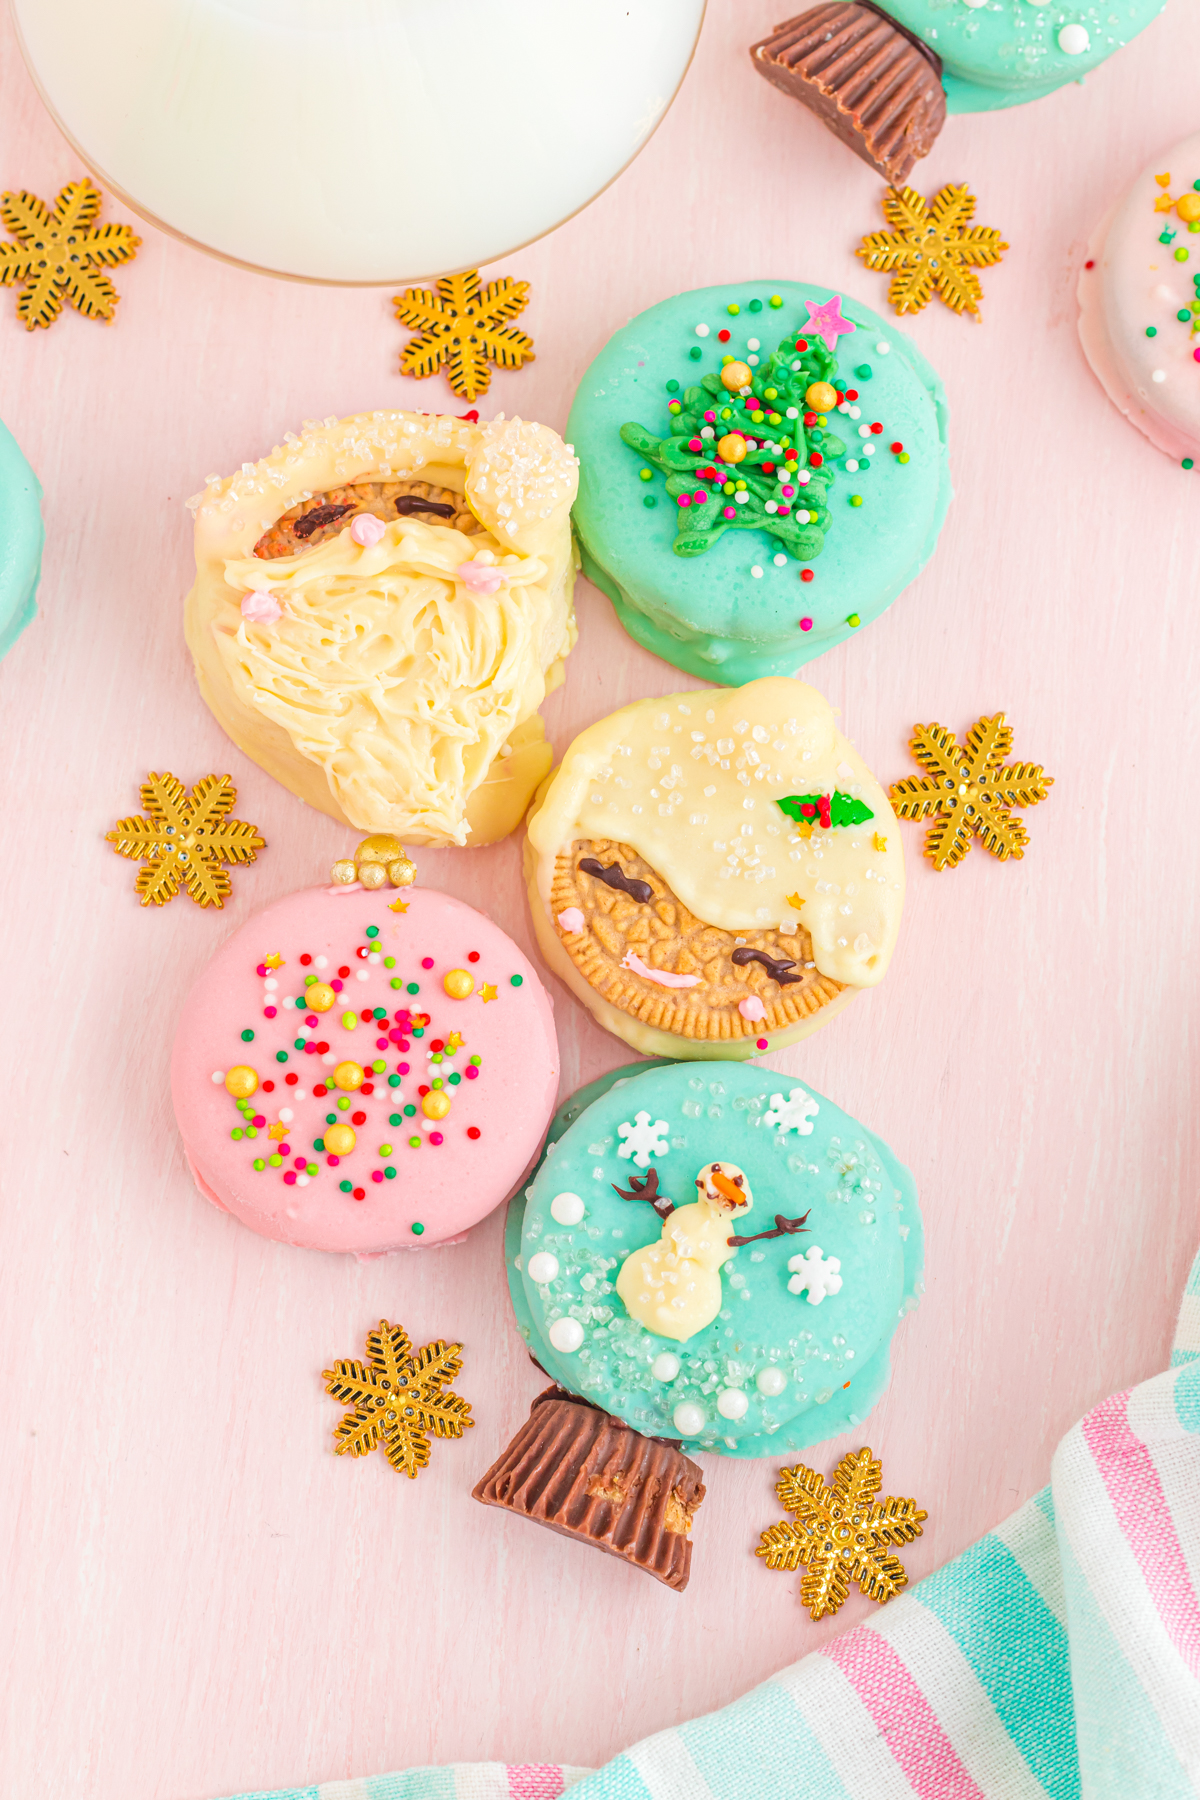
These cute Christmas Oreo cookies are the cutest Christmas cookies ever with various designs, flavors, and decorations! They’re perfect for sharing at a Christmas party, they make great gifts, and they’re tasty!
Want to save this recipe?
Enter your email below and we’ll send this idea straight to your inbox (plus you’ll receive fun weekly ideas from us too!)
My family always has Oreo cookies on hand, and I found out when we were making these Easter Oreos that my kids love to turn the Oreos into something else by dipping them in chocolate and decorating them!
Last year we made Oreo snowman cookies that everyone loved, and this year we made these adorable Christmas Oreos and my boys had a great time turning them into snow globes, ornaments, and more!
And with all sorts of variations to choose from, there’s an option for any age who wants to make these cute Christmas treats!
Make them for a cookie exchange, make them to add to Christmas treat plates, or just make them for you to enjoy on your own!
If you have leftover Oreos in the pack, use them to make these Oreo truffles, they’re perfect to go with these Christmas Oreo treats!
Why you’ll love this
- Multiple designs – decorate them however you want, from festive sprinkles to Mrs. Claus to a snow globe.
- Simple ingredients – with melted chocolate, Oreos, and edible decorations you can have the perfect treat this holiday season.
- Perfect for all ages – not only will everyone want to eat them but it’s a great activity that all family members can enjoy together.
Ingredients
Ingredient Notes
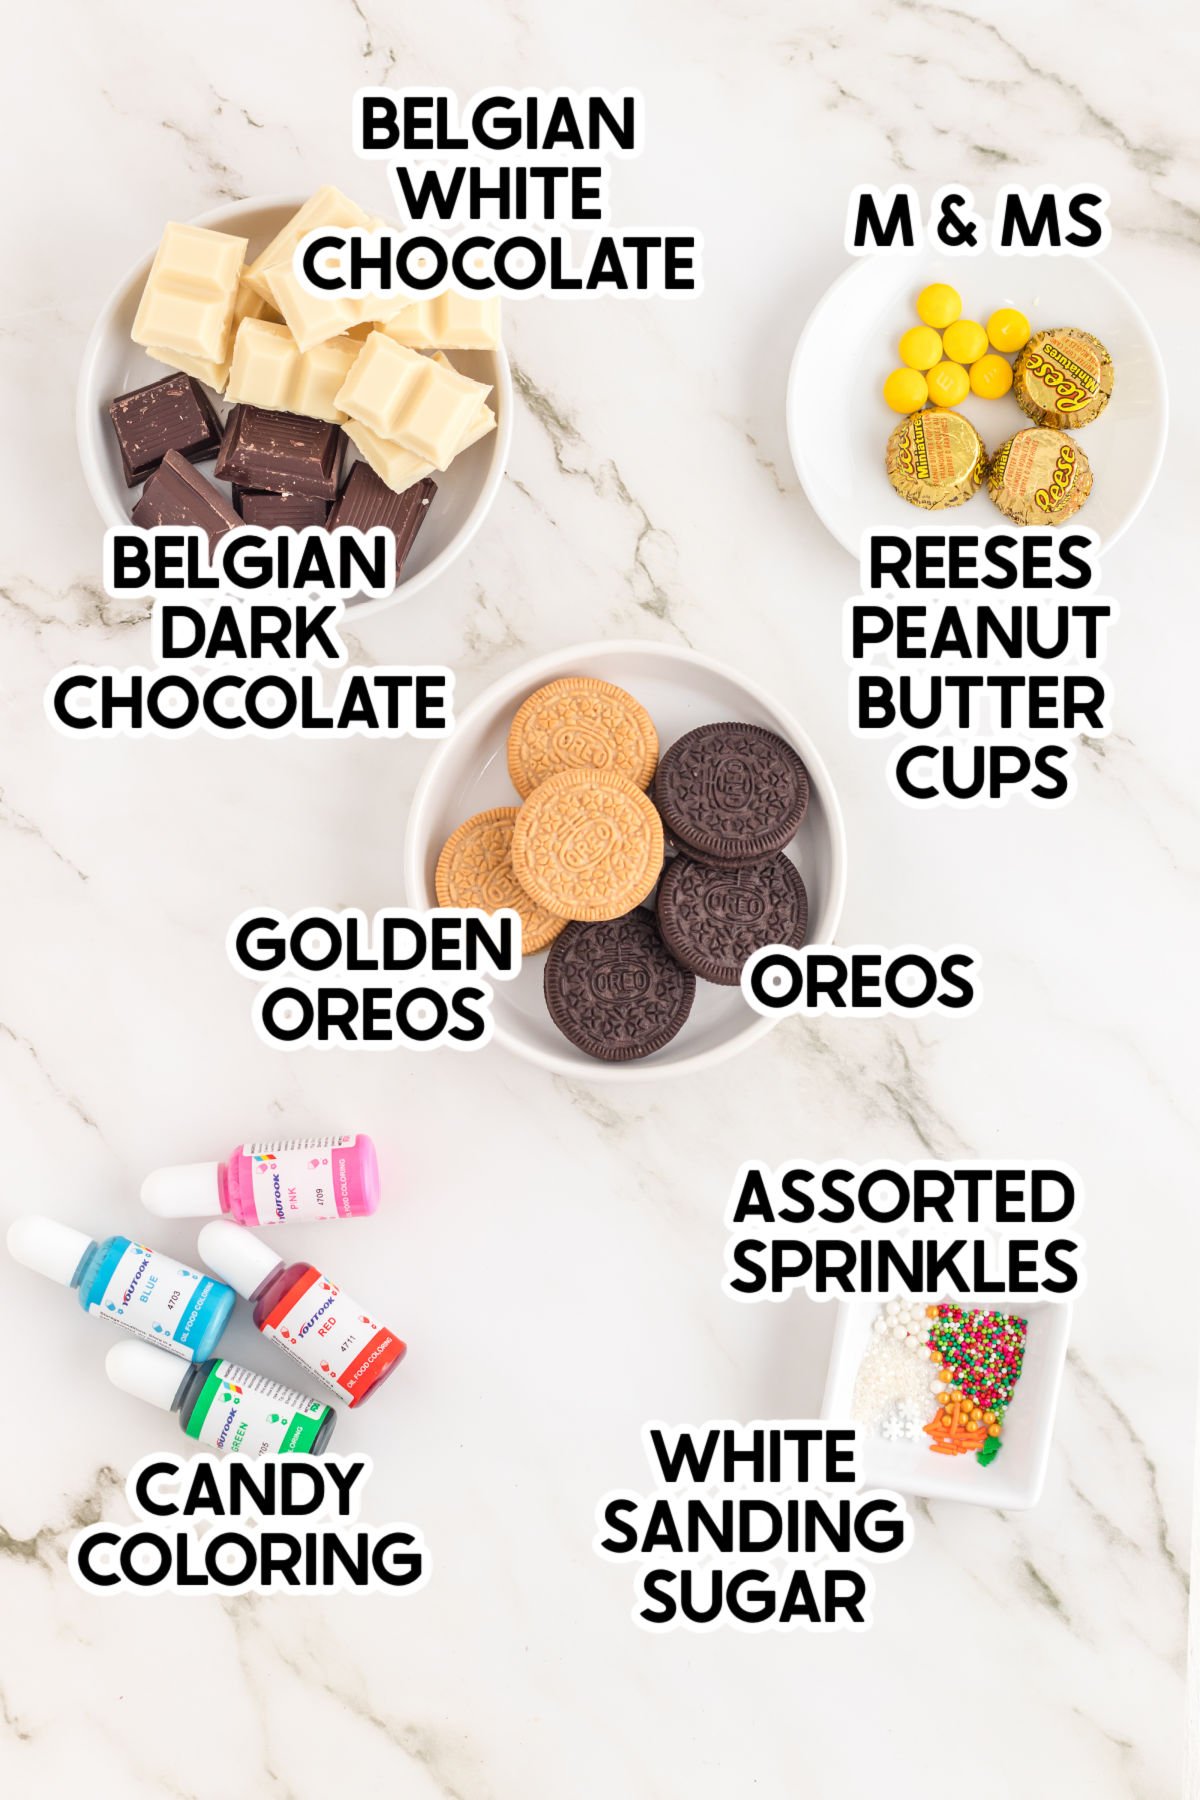
- Oreos – you will want both Golden Oreos and any type of chocolate Oreos, such as regular Oreos or mint Oreos. An off-brand sandwich cookie will work as well.
- Melting chocolate – I prefer working with Belgium chocolate but any type of melting wafers, high-quality white chocolate chips, or almond bark will also work. Choose the type of chocolate you like – white, semi-sweet chocolate, and dark chocolate all work great!
- M&Ms – any candy that is roughly the same size will work, the color doesn’t matter.
- Candy coloring – candy coloring mixes easily with the melted white chocolate but any type of food coloring will work.
- Various sprinkles – a variety works best so you can make different designs. The only thing you really need for sprinkles is a star sprinkle to put on top of the tree!
- Reese’s – this fun-sized candy is the perfect shape for the snow globes. You can change it out for another candy of similar shape and size.
Recommended tools
I also recommend getting a set of food tweezers if you don’t have them already. They make putting the little decorations (like the star) onto these Christmas Oreos just a little easier. You don’t have to of course, it just makes things a bit easier!
How to Make Christmas Oreos
With so many different designs, I thought it would be best to break them down into four separate sets of instructions with pictures to go along with each set. Make a whole batch of ornaments or fill a plate with a variety of chocolate-dipped Oreos.
1 – Melt the White Chocolate
To begin you will need to melt the chocolate, regardless of which of the designs you are making.
- Place the measured chocolate in a microwave-safe bowl and microwave it for 30 seconds.
- Stir the chocolate mixture and microwave it again for another 30 seconds. Repeat, continuing the 30 second intervals and stir process until the chocolate is fully melted and smooth.
Recommended tool
If you dip a lot of chocolate covered things, I highly recommend this Wilton melting pot. You put the chocolate in, turn it on, and the chocolate melts and stays melted. It’s perfect for when you’re dipping a bunch of different things – plus the pot is silicone, which makes it super easy to clean!
If you don’t have a melting pot and don’t want to use the microwave, you can always melt the chocolate in a double boiler on the stove as well – it just takes a little longer, but it easier to control the chocolate!
2 – Melt the Decorating Chocolate
In addition to the base white chocolate, you’ll need to melt the following in their own bowls using the same method. Once the chocolate is melted, add food coloring as directed after the chocolate is fully melted. These will be used for actually decorating the Christmas Oreos.
- 3/4 cup white chocolate
- 1/4 cup dark chocolate
- 3/4 cup white chocolate tinted light blue
- 1/2 cup white chocolate tinted pink
- 1/4 cup white chocolate tinted green
- 1/4 cup white chocolate tinted red
Tip!
If the chocolate hardens while decorating the cookies, put it back into the microwave to melt. Microwave the chocolate in microwave-safe bowls in 30-second increments until fully melted.
3 – Decorate the Christmas Oreos
Okay, now that you have your chocolate all melted – it’s time to decorate. I’ve written out instructions for each of the different types of Christmas Oreos I’ve shared in this post.
Choose the ones you like the best and make those! If you’re doing this with kids, I recommend sticking to the simpler ones like the ornament with sprinkles, the Christmas tree, and the snow globe! Santa and Mrs. Claus are a little more complicated with the piping!
Mrs. Claus Cookies
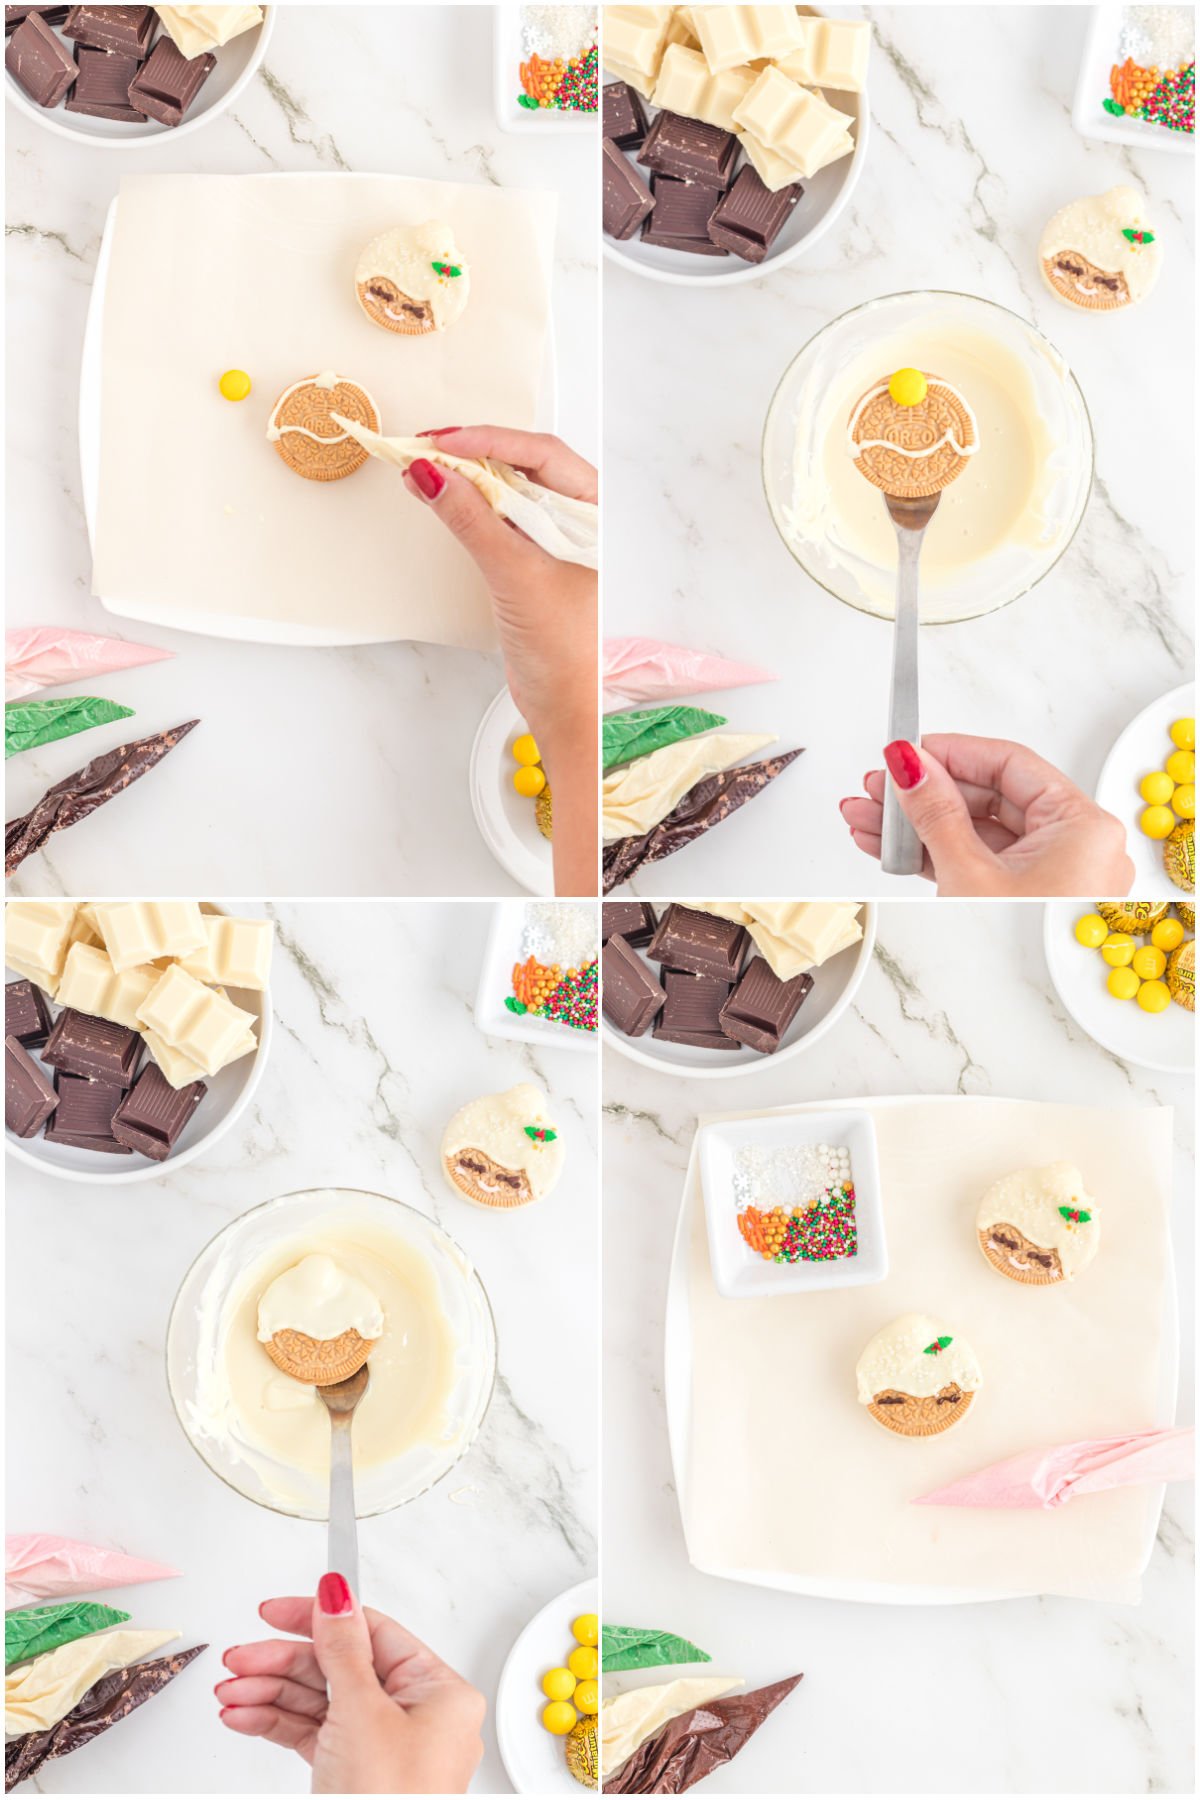
- Add about one tablespoon of the melted white chocolate with no food coloring to a piping bag, or use a small zipper top bag and cut a small corner of the bag to pipe with.
- Pipe the outline of Mrs. Claus hair on the Oreo. To do this, outline half of the Oreo then connect the two halves with a wavy line that would resemble bangs.
- Add a dot of the white chocolate on the top of the Oreo and add an M&M so it looks like a bun on the top of her head. Place the cookie on a parchment-lined baking sheet and place in the freezer until the chocolate is set on the cookie.
- While the cookies are in the freezer, prepare the other piping bags or small zipper top bags by filing them with 1 Tablespoon of melted dark chocolate in one bag, 1 tablespoon of melted pink white chocolate in another bag, and 1 tablespoon of melted green chocolate in a third bag.
- Once the chocolate has hardened, take the cookies out of the freezer and using a fork, dip each cookie into the bowl of white chocolate. Make sure to only cover Mrs. Claus’ bun, hairline, and the back of the Oreo. Let the excess chocolate drip off the cookie. Put the cookies back onto the parchment-lined baking sheet after you dip them in the white chocolate.
- To add extra decoration to Mrs. Claus’ hair, add leaf sprinkles or whatever sprinkles you want to the bun and then dip a toothpick into the red chocolate and make little holly berries next to the bun.
- With the dark chocolate, pipe eyes onto Mrs. Claus (or you could also use candy eyes if you’d prefer, I just like the look of the piped eyes). Then with the pink chocolate, pipe a little mouth and cheeks.
- Let the decorations on the cookies set completely before eating.
Santa Clause
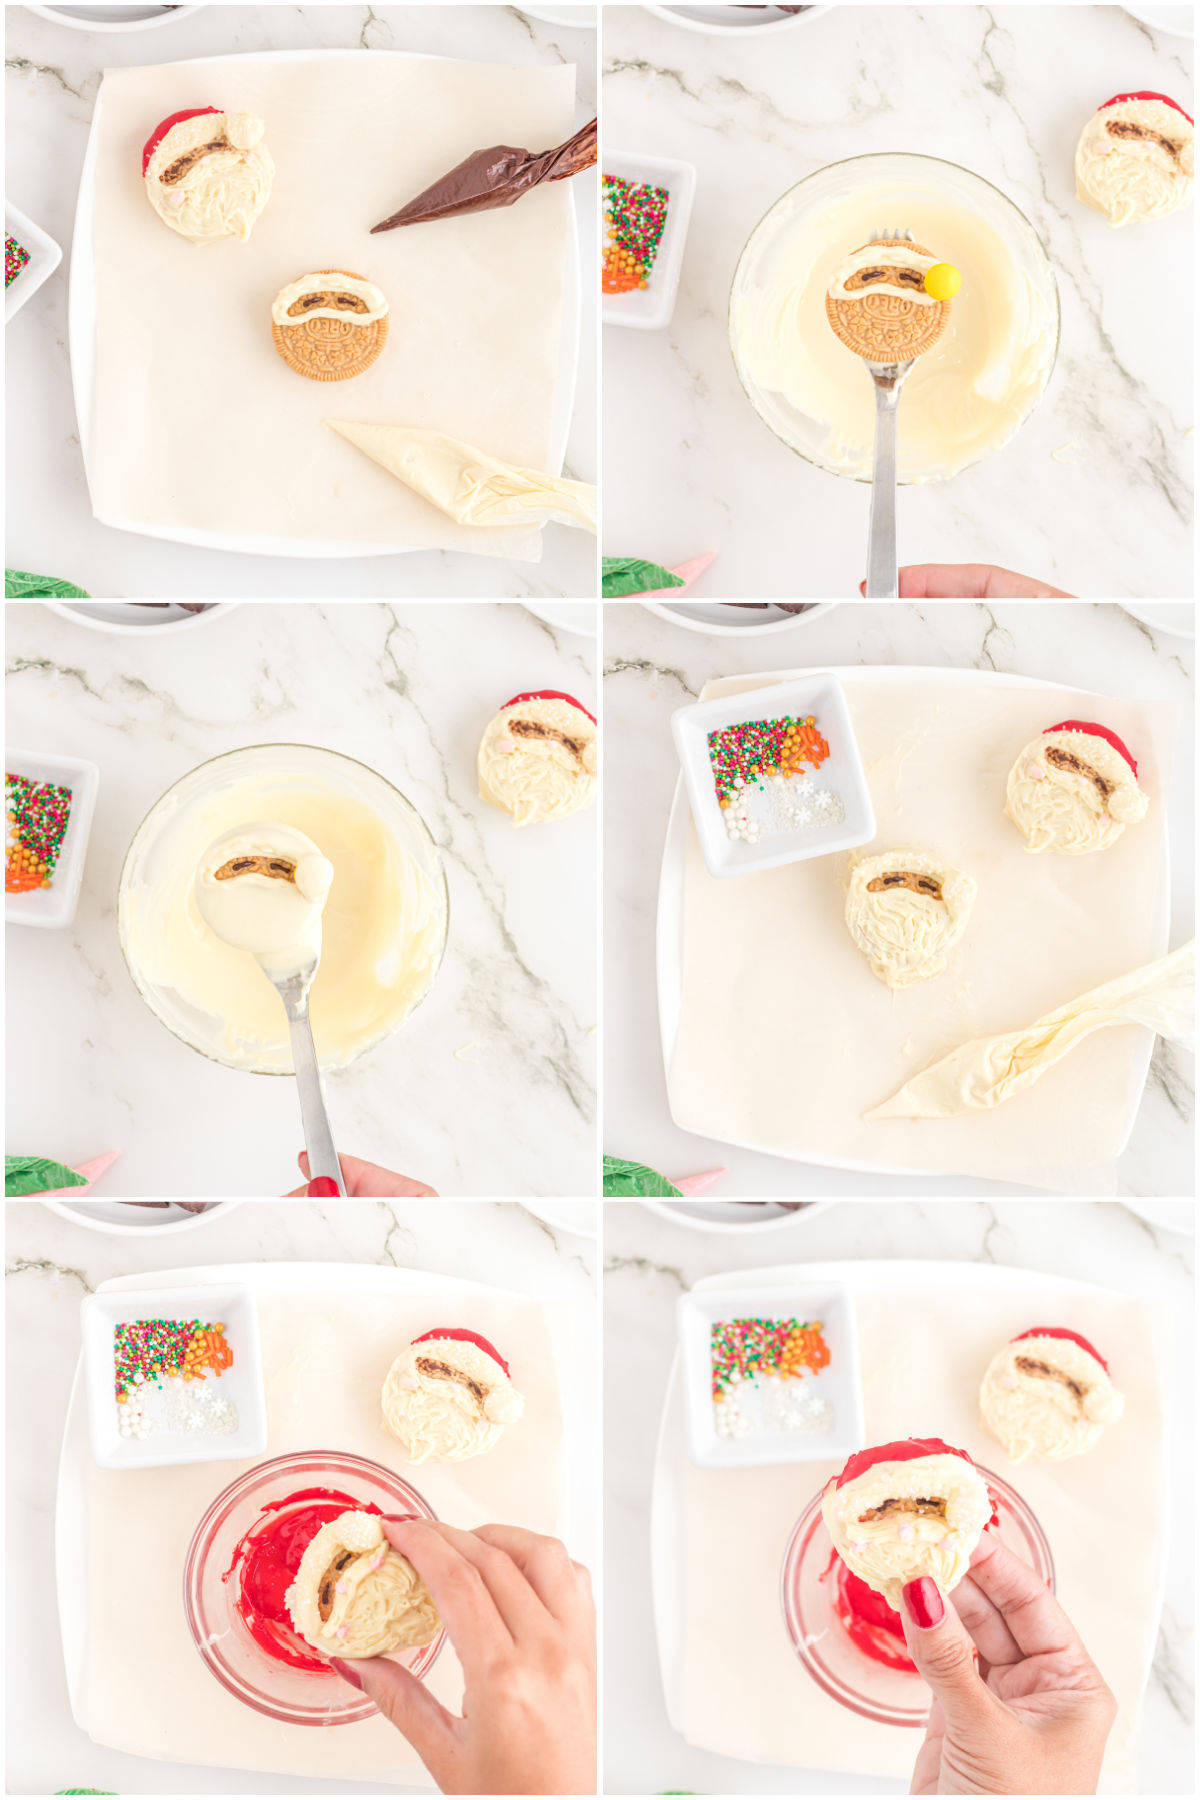
- Start by lining a baking sheet with parchment paper. Pipe eyes on the top third of the cookie with the dark chocolate.
- Use the white chocolate to make an outline around Santa’s eyes and to make the furry collar of this hat.
- Place the cookies on the prepared baking sheet and place them into the freezer until the chocolate has set.
- Just like you did with Mrs. Claus, use a fork and dip each cookie into the bowl of white chocolate, making sure not to cover his eyes. Let the cookie drip for a minute to get any excess chocolate off of it.
- Dip a M&M into the white chocolate then place it on the side of the furry collar to the right of his eyes.
- Put the cookies back onto the parchment-lined baking sheet. To add some sparkle to Santa’s hat and beard, sprinkle them with white sanding sugar.
- For the detail on Santa’s beard, use a small fork and create some texture by either poking the fork into the chocolate or creating lines.
- Pipe a little mustache with the white chocolate just above the beard.
- With the pink chocolate pipe the rosy cheeks and a nose.
- Put the Santa cookies into the freezer to set.
- After they have set gently dip the top of Santa’s head into the red chocolate so it looks like the top of his hat.
- Allow the chocolate to set before serving.
Ornament Oreos
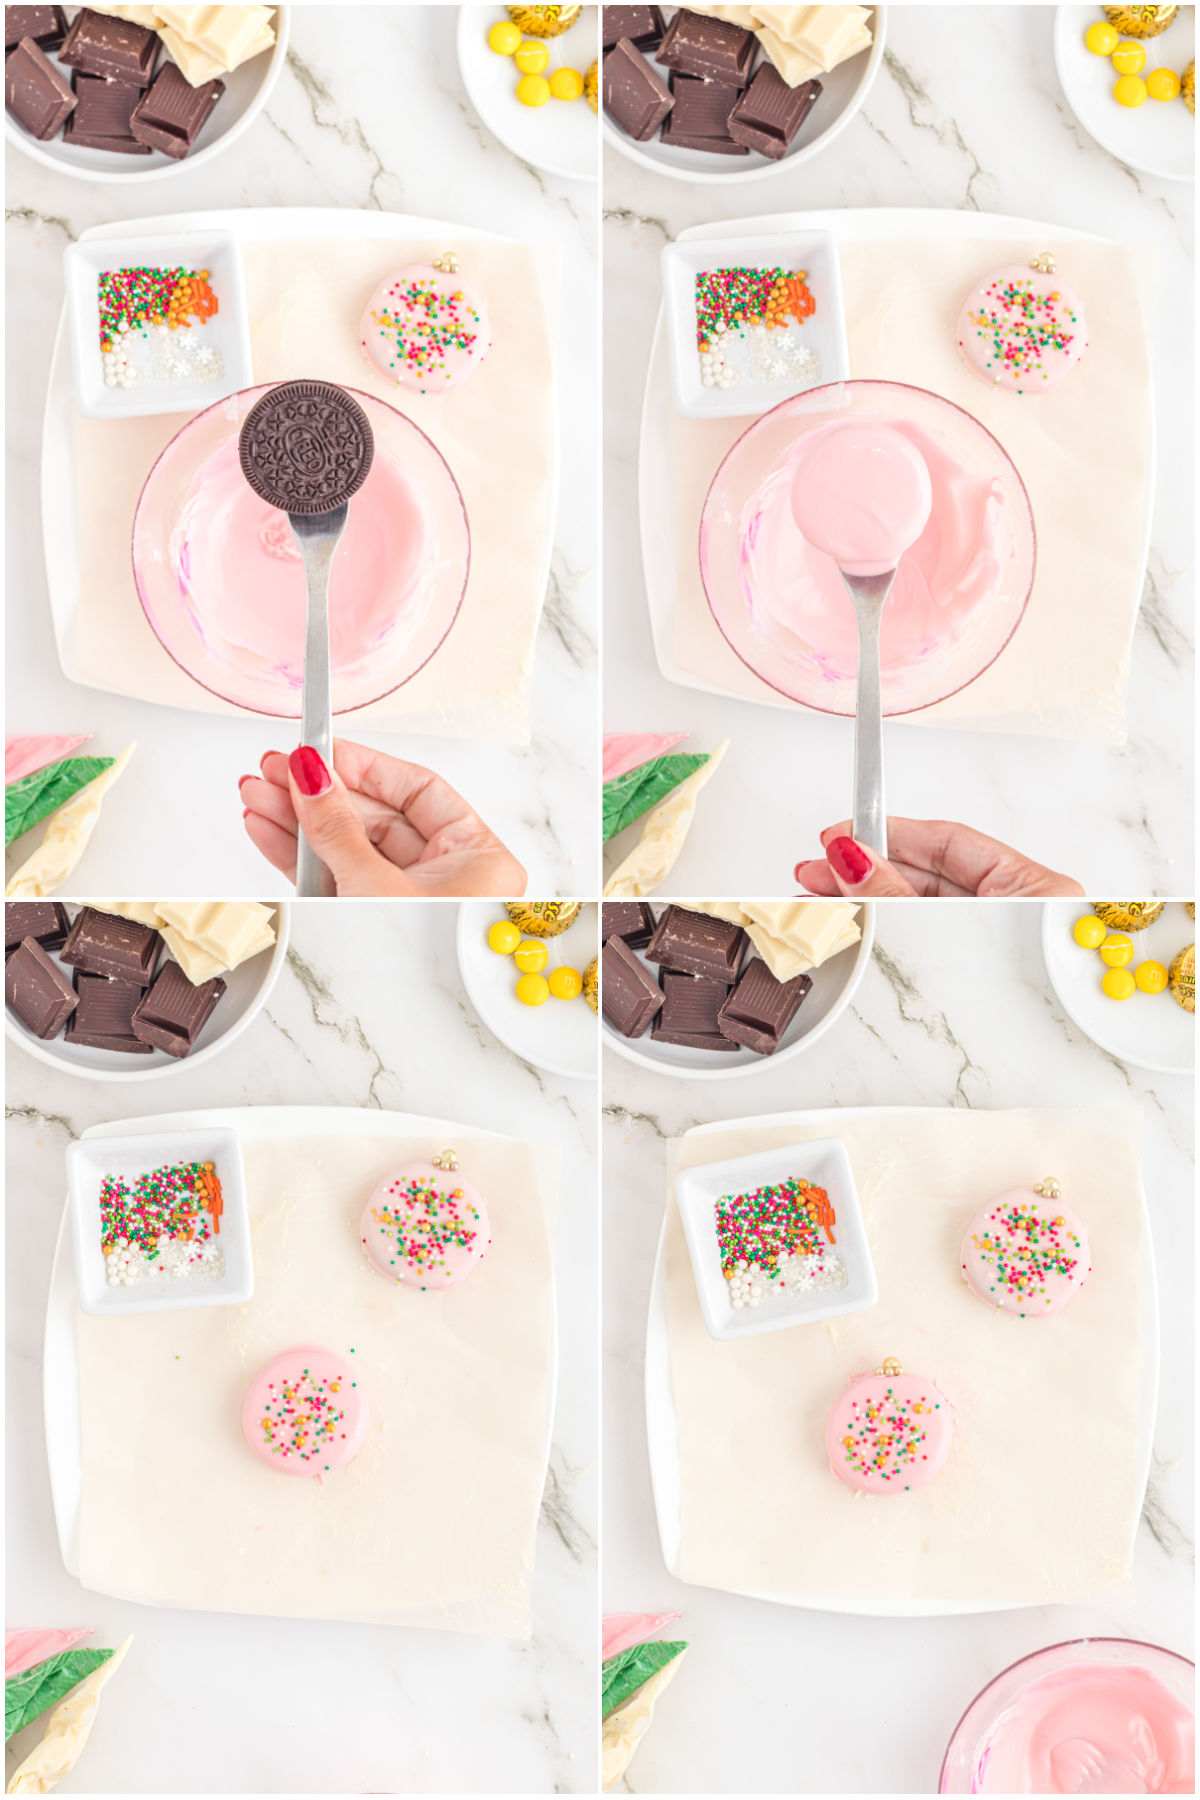
- Coat each Oreo with pink chocolate. Let any excess chocolate drip off the cookie. You can gently tap on the side of the bowl if it’s not coming off easily.
- Place the cookies on a parchment lined baking sheet. Then place the cookies in the freezer to set.
- Spread a little white chocolate on top of the cookies and sprinkle the metallic ball sprinkles on top of the white chocolate. It should look like the top of an ornament.
- Let the ornament cookies set before serving.
Christmas Tree Oreos
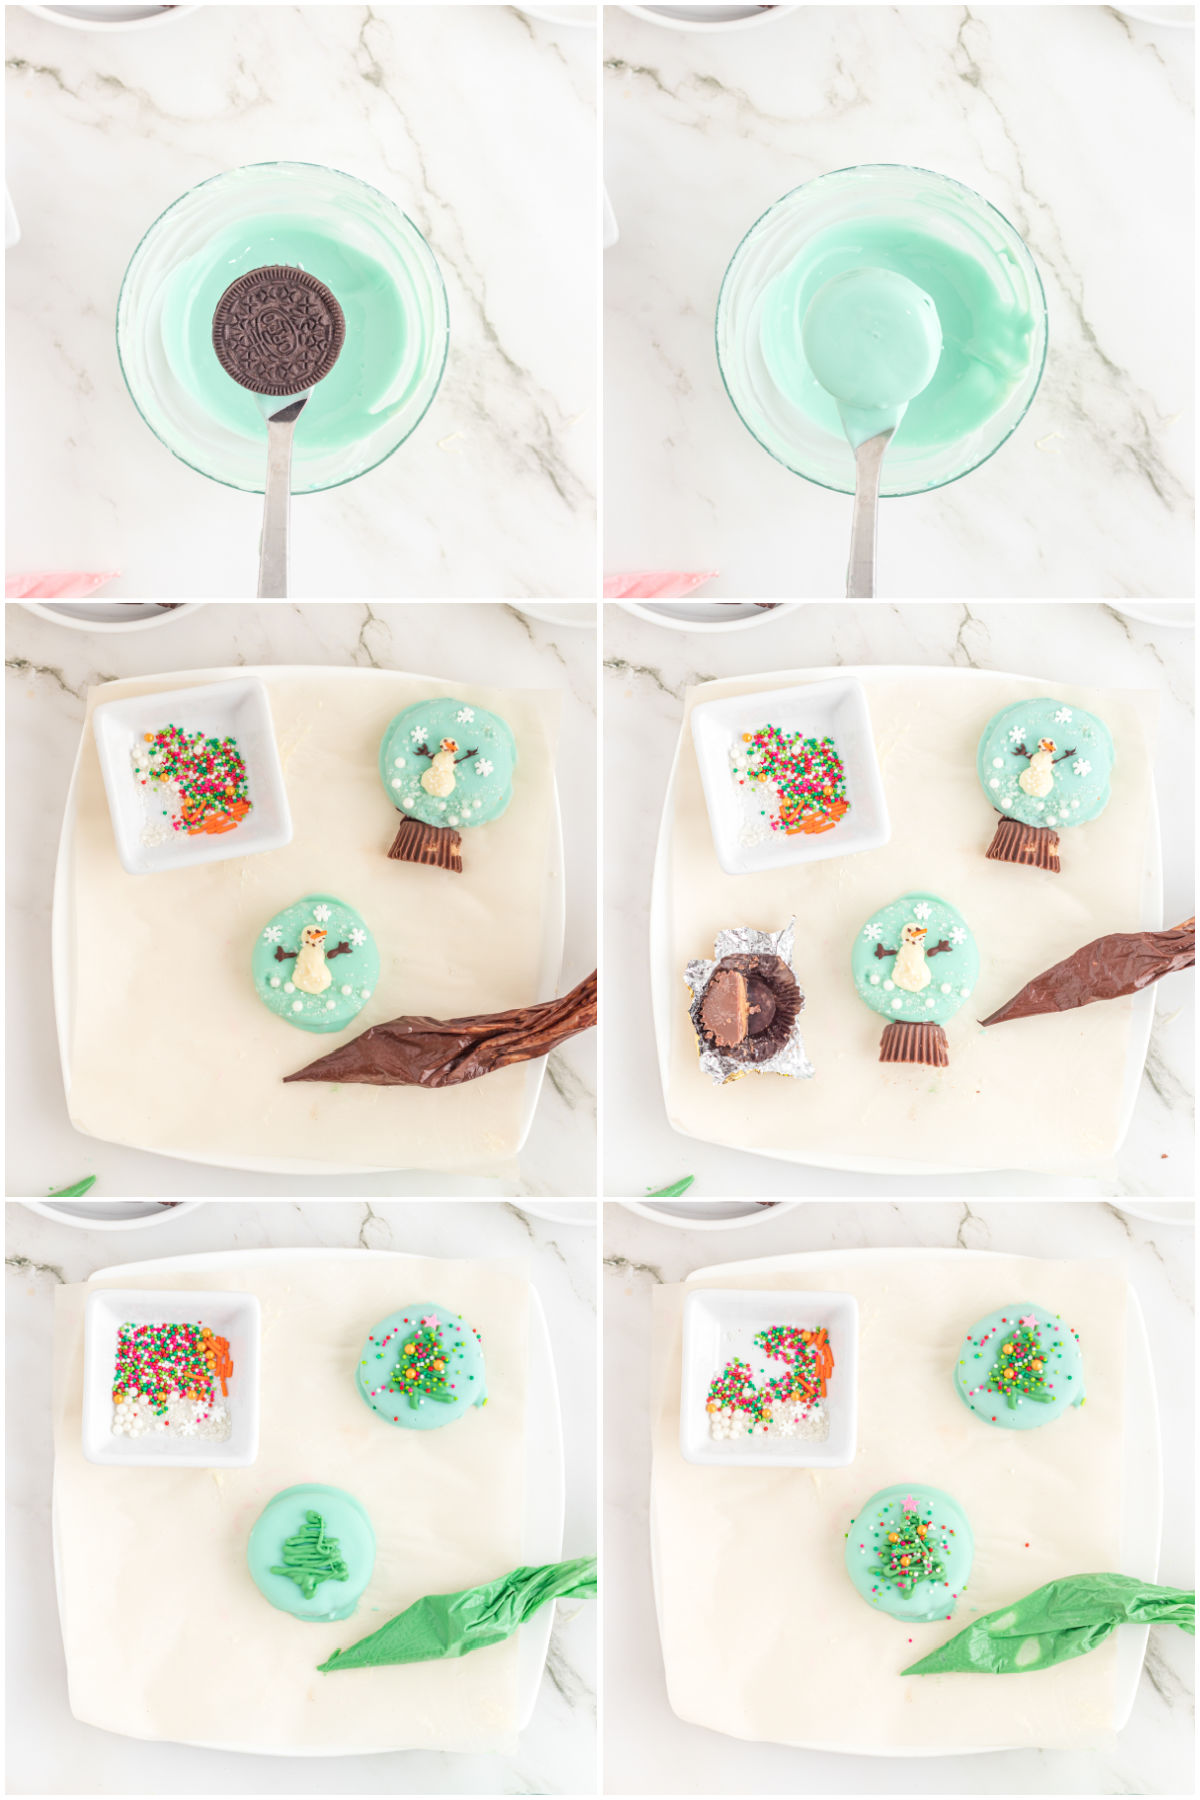
- Dip the whole Oreo into the light blue chocolate, making sure to let any excess chocolate drip off the cookie.
- Place the cookies on a parchment lined baking sheet and freeze the cookies until the chocolate is set.
- Put some of the green chocolate into a piping bag or a zipper top bag and pipe a Christmas tree over the cookies.
- While the green chocolate is still soft, add your favorite sprinkles on top of the green trees. Add a yellow sprinkle star to the top of the tree if desired!
- Let the ornament cookies set.
Snowman Snow Globe Oreos
- Dip the whole Oreo into the light blue chocolate, making sure to get rid of any excess chocolate.
- Sprinkle sanding sugar on top and decorate the bottom of the cookie with pearl sprinkles.
- Place the cookies on a parchment lined baking sheet and let them set in the freezer for a few minutes or until the chocolate has set.
- Add the white chocolate to a piping bag or a zipper top bag cut in the corner and pipe a snowman in the middle of the snow globe cookie.
- While the chocolate is still soft, sprinkle the sugar on top of the white chocolate.
- Put the dark chocolate in a piping bag or zipper top bag and pipe eyes and a mouth. Then pipe the arms on each side of the snowman.
- For the carrot nose, put a long orange sprinkle just below the center of the eyes.
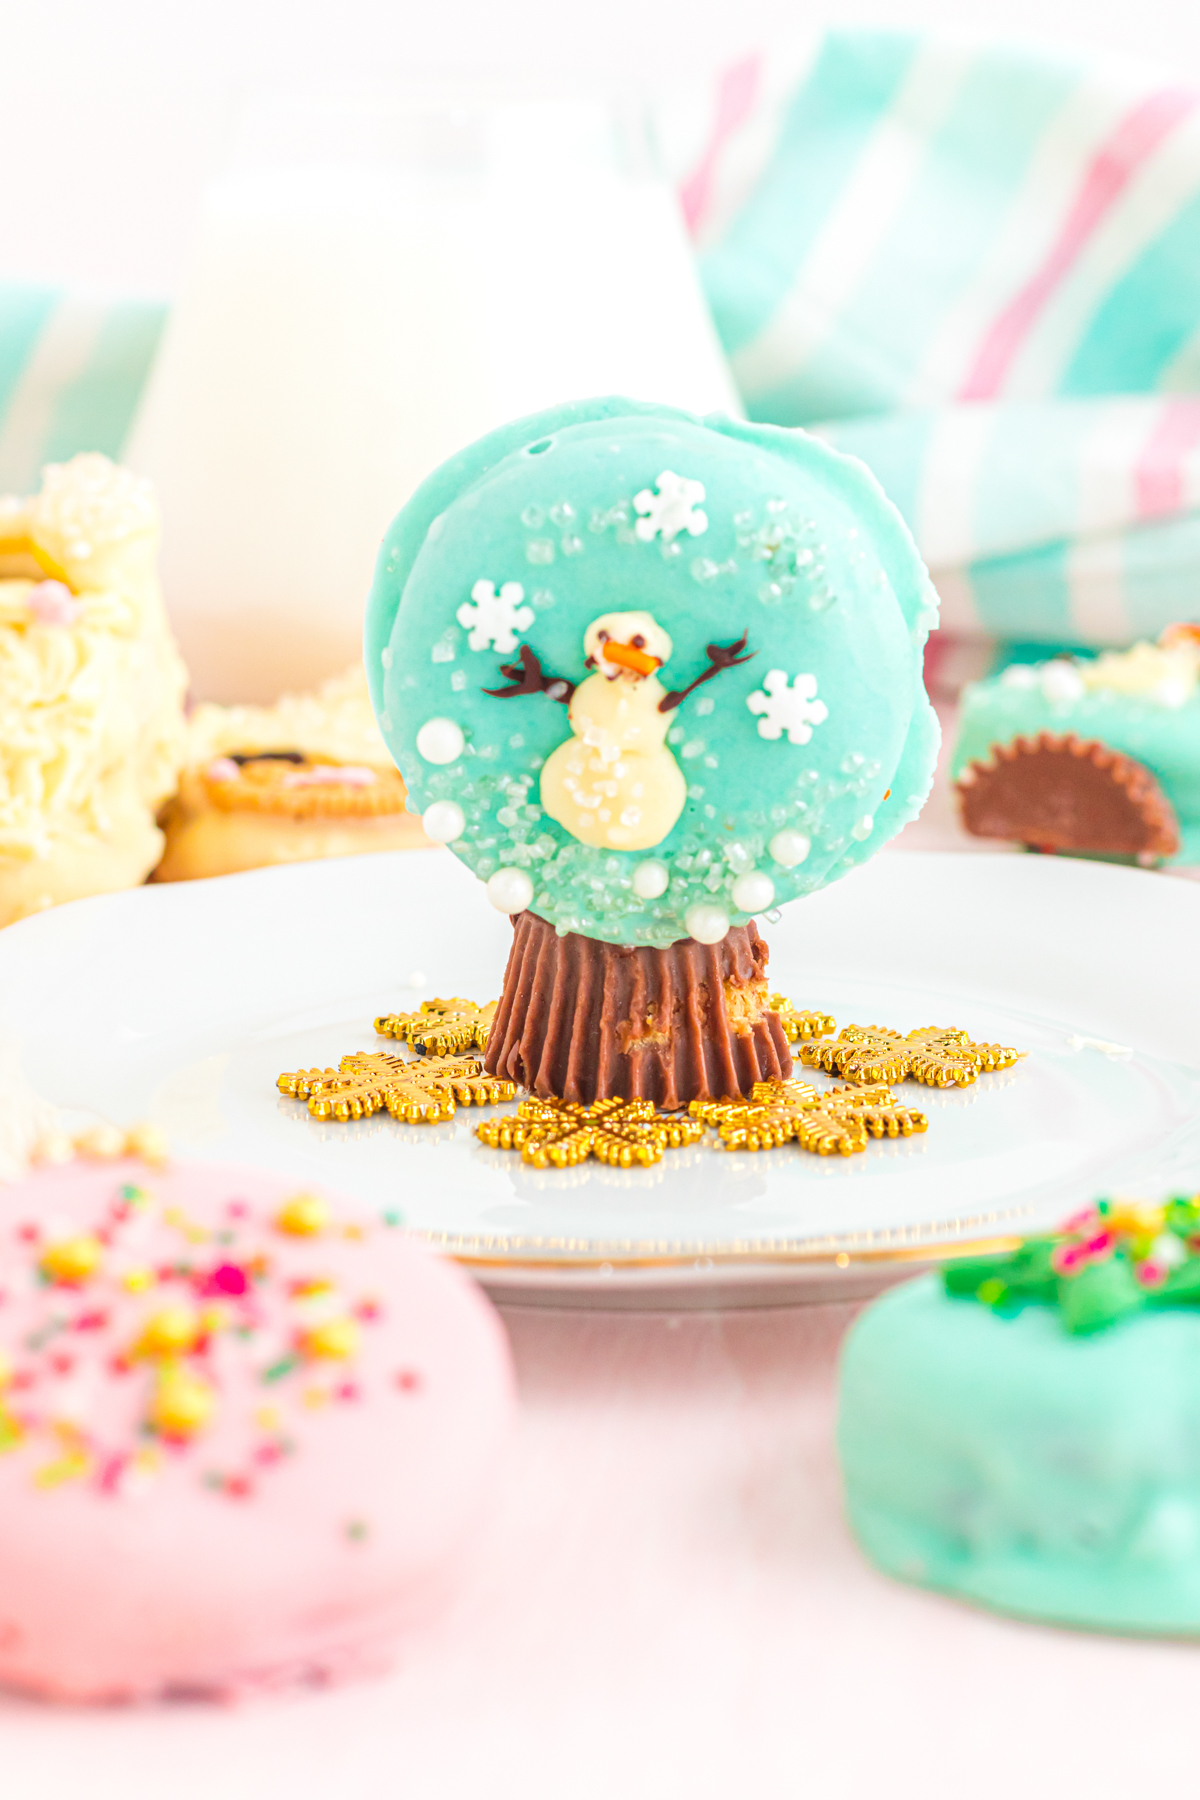
- Make the base of the snow globe by cutting Reese’s buttercup in half and using a little dark chocolate, stick Reese’s cup to the bottom of the cookie.
- Let the snow globe cookies set before serving.
4 – Serve the Christmas Oreos
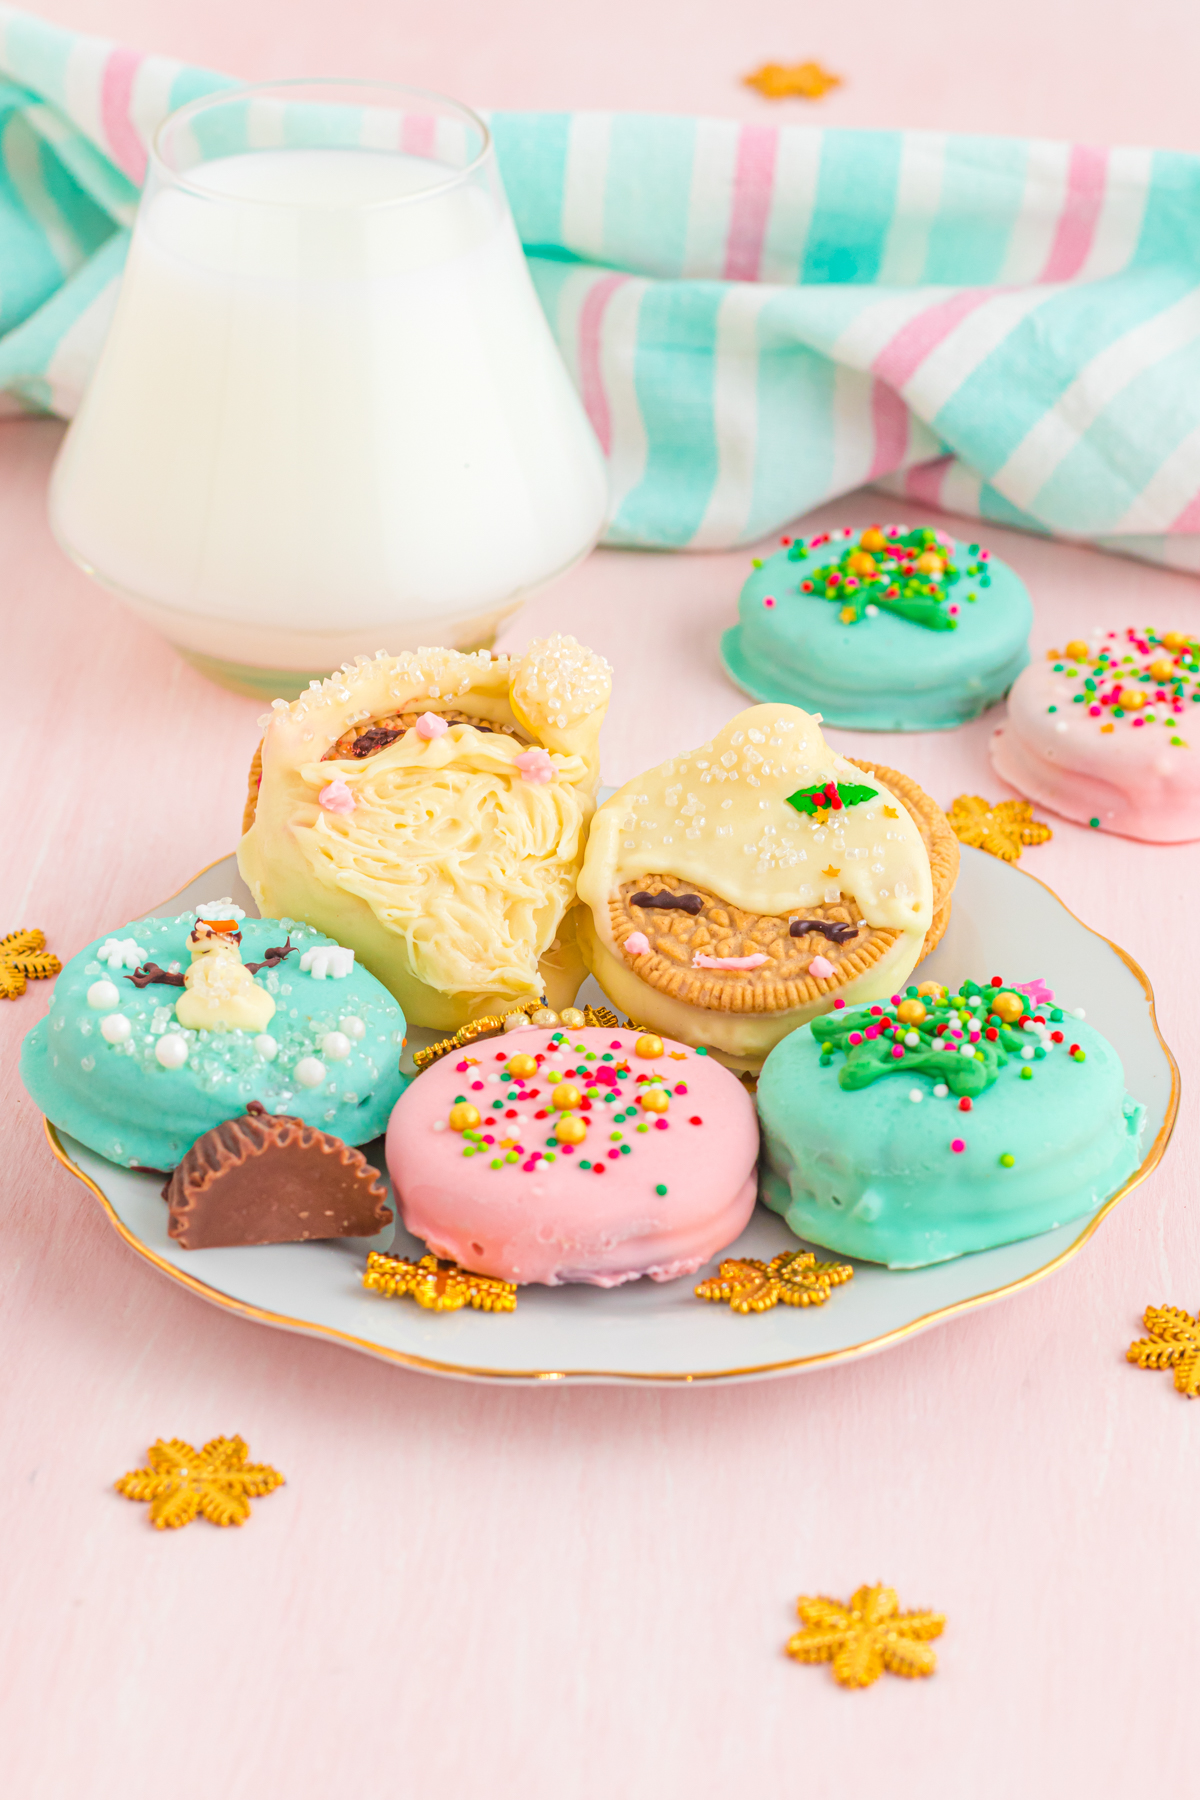
Once all of your Oreos are decorated and set, it’s time for the best part of making these cookies – eating them! Just make sure you have some milk on hand to wash them down!
These Christmas Oreos are also great to serve for a Christmas party, to give away with gifts with these Christmas gift tags, or to gift out as cute Christmas party favors!
Tips & Storage Info
When coating the Oreos place a fork in the filling of the Oreo then either fully submerge the Oreo into the melted chocolate or dip one side then flip to dip the other side if it is not deep enough to dunk.
Add a tablespoon coconut oil to the chocolate if it is too thick to dip.
Using a double boiler method to melt the chocolate works better when working with chocolate chips.
Using a mold like this one can make it easier to fully coat the Oreos.
Store in an airtight container at room temperature in a cool dry place for up to five days or two weeks in the fridge.
Recipe FAQs
How far in advance can you make chocolate-covered Oreos?
These chocolate-covered Oreos can be made up to a week in advance if properly stored in an airtight container!
How do you dip Oreos in chocolate without a mold?
To dip Oreos in chocolate without using a mold, place the Oreo on top of a fork, then gently dip it into a bowl of melted chocolate tossing when necessary to coat it completely. I sometimes use a spoon as well to pour chocolate over top of the Oreo.
Alternately, you can place a lollipop stick in the center of the Oreo (in the creme filling) and use that to dip the Oreo. I’ve just found that sometimes it accidentally breaks the Oreo in half or the Oreo falls off.
Can I use different flavor Oreos for these Christmas Oreos?
You can use any flavor of Oreos you want for the ornament, snow globe, and Christmas tree Oreos that are dipped completely in chocolate. I think a Christmas flavor like peppermint, red velvet, or mint would be great! I do recommend using the golden Oreos for Santa and Mrs. Claus since it’s supposed to be their skin!
More Cute Christmas Treats
If you like cute Christmas treats, you should try one of these fun Christmas recipes next!
- Hot chocolate cookie cups – these cute little treats turn sugar cookies into mini hot chocolate cups!
- Reindeer chow – this fun Christmas snack mix is like a sweet Chex Mix but reindeer inspired!
- Christmas hand pies – these fun treats take mini pies to a new Christmas tree level!
- Christmas tree brownies – easy brownies topped with the cutest Christmas trees!
- Melted snowman cookies – cookies that look just like snowman melted on top!
Want more Goodies?
Want more delicious recipes just like this one? Enter your first name and email address in the form below to join the Play Party Plan community! You’ll receive weekly recipes and party ideas directly to your inbox!

Christmas Oreos
Ingredients
- ¼ cup belgian dark chocolate
- 2.5 cups belgian white chocolate (divided)
- pink food coloring
- blue food coloring
- green food coloring
- red food coloring
- 4 Golden Oreos
- 4 M&M candies
- 6 Oreos
- assorted sprinkles
- white sanding sugar (for decoration)
- 1 Reese’s Peanut Butter cup
Instructions
- Melt all the chocolate in separate microwavable bowls then add the food coloring as described. – 1/4 cup of dark belgian chocolate– 3/4 cup belgian white chocolate – 3/4 cup belgian white chocolate tinted blue– 1/2 cup belgian white chocolate tinted pink– /4 cup Belgian chocolate tinted green– 1/4 cup belgian white chocolate tinted red.1/4 cup belgian dark chocolate, 2.5 cups belgian white chocolate, pink food coloring, blue food coloring, green food coloring, red food coloring
- Microwave the chocolate in microwave safe bowls in 30 second increments until fully melted.
Mrs. Claus
- To make the Mrs. Claus cookies, add about 1 tablespoon of the melted white chocolate with no food coloring to a piping bag. Or use a small ziplock bag and cut a small corner of the bag to pipe with.4 Golden Oreos
- Begin by piping the outline of Mrs. Claus’ hair on the Oreo. Then add a dot of the white chocolate on the top and add an m&m. Place the cookie on a parchment lined baking sheet and place in the freezer until the chocolate is set on the cookie.4 M&M candies
- Prepare the other piping bags or small ziploc bags. 1 Tablespoon of melted dark chocolate into one bag, 1 tablespoon of the melted pink white chocolate in another bag, and 1 tablespoon of melted green white chocolate in one bag.
- Once the chocolate has hardened take the cookies out of the freezer and using a fork, dip each cookie into the bowl of white chocolate. Make sure to only cover Mrs. Claus’ bun, hairline, and the back of the Oreo. Let the excess chocolate drip off the cookie. Put the cookies back onto the parchment lined baking sheet.
- To add extra decoration to Mrs. Claus’ hair, add leaf sprinkles or whatever sprinkles you want to the bun and then dip a toothpick into the red chocolate and make little holly berries next to the bun.assorted sprinkles
- With the dark chocolate, pipe eyes onto Mrs. Claus. Then with the pink chocolate, pipe a little mouth and cheeks.
- Let the cookies set!
Santa Claus
- To make Santa Claus, start by lining a baking sheet with parchment paper. Then with the dark chocolate pipe eyes on the top third of the cookie.4 Golden Oreos
- Make an outline around Santa’s eyes and add the furry part of his hat.
- Place the cookies on the prepared baking sheet and place them into the freezer until the chocolate has set.
- Use a fork and dip each cookie into the bowl of white chocolate, make sure not to cover his eyes. Let the cookie drip for a minute to get any excess chocolate off of it. The pom pom on the side should be covered.
- Put the cookies back onto the parchment lined baking sheet. To add some sparkle to Santa’s hat and beard sprinkle them with white sanding sugar.white sanding sugar
- For santa’s beard use a small fork and create some texture by either poking the fork into the chocolate or create lines.
- Pipe a little mustache with the white chocolate just above the beard.
- With the pink chocolate pipe the rosy cheeks and a nose.
- Put santa cookies into the freezer to set. After they have set gently dip the top of Santa’s head into the red chocolate so it looks like the top of his hat.
- Make sure the chocolate has set before serving.
Ornaments
- For the ornament cookies, dip each oreo into the pink chocolate. Let the any excess chocolate drip off the cookie.6 Oreos
- Place the cookies on a parchment lined baking sheet. Then place the cookies in the freezer to set.
- Spread a little white chocolate on top of the cookies and sprinkle the metallic sprinkles on top of the white chocolate.assorted sprinkles
- Let the ornament cookies set before serving.
Christmas Tree
- For the Christmas tree cookies, dip the whole oreo into the blue chocolate. Make sure to let any excess chocolate drip off the cookie.
- Place the cookies on a parchment lined baking sheet and freeze the cookies until the chocolate is set.
- Put some of the green chocolate into a piping bag or ziploc bag and pipe a Christmas tree over the cookies.
- While the green chocolate is still soft, add your favorite sprinkles on top of the green trees. Add a yellow sprinkle star to the top of the tree if desired.assorted sprinkles
- Let the ornament cookies set
Snow Globe
- For the snow globe cookies, dip the whole oreo into the blue chocolate.
- With some sanding sugar, sprinkle it on top and decorate the bottom of the cookie with pearl sprinkles.
- Place the cookies on a parchment lined baking sheet and let them set in the freezer for a few minutes or until the chocolate has set.white sanding sugar
- Add the white chocolate to a piping bag or ziploc bag cut in the corner and pipe a snowman in the middle of the snow globe cookie. While the chocolate is still soft, sprinkle the sugar on top of the white chocolate.
- Put the dark chocolate in a piping bag or ziploc bag and pipe eyes and a mouth. Then pipe the arms on each side of the snowman.
- For the carrot nose, put a long orange sprinkle just below the center of the eyes.assorted sprinkles
- Make the base of the snowglobe by cutting a Reese buttercup in half and using a little dark chocolate, stick the reese cup to the bottom of the cookie.1 Reese’s Peanut Butter cup
- Let the snow globe cookies set before serving.






Leave a Reply